
Hi all
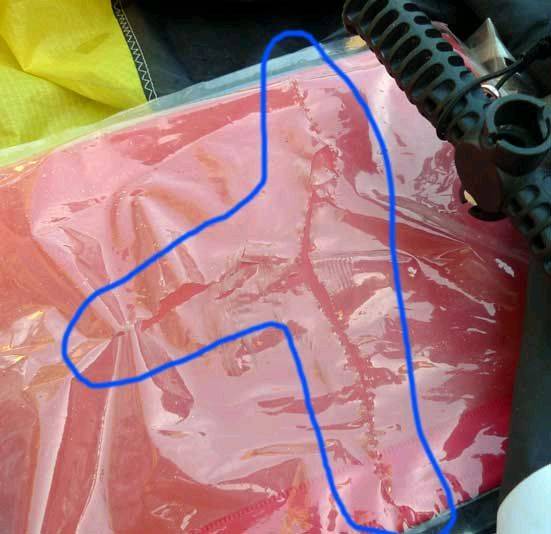
Is this repairable with Tear Aid or should I just replace the whole bladder? The top and bottom tears come to 15mm of the outside edge of the seam. This would mean there is 15mm for the patch to adhere on the edges. Is that enough?
I will get Neil at Hold the Lines to repair the LE rip. Does he also do the bladder or is this easy enough for me to do myself?
Cheers
Shane
Yeah thats definitely repairable, you can send it to me if you want. We would asess it once it gets here as to what method we would use.
Probable cost around 60-70 = postage and will be as good as a new bladder, actually stronger in the repaired area!
Repair it yourself with couple big bits of tear aid,, easy
Just make a straight cut about 20cm away from the tear, about 5cm in length. Then pull the bladder through the hole (inverting it) and patch with tear aid. Lastly pull back through the hole and seal it up with more tear aid.
Yep 15mm should be fine, you could even overlap a bit to be sure.
Done it before and never leaks again,, good luck
dave
Cane Toad ![]()
Take it to John at S.O.S in fremantle - they do excellent bladder repairs there and take your kite to Neil - Hold the Lines while its being done.
When you 'do it yourself' repair, just make sure you think about Nukeing days in wave sets or offshore at Woodies ![]()
![]()
![]()
![]() [}:)]
[}:)] ![]()
Cheers
Did a repair a while back in a similar spot, by inverting the bladder I was able to get a clean patch done (with a bigger piece than if I just put a patch on the outside), also put a smaller one on the outside to be sure... Overkill I know but its tough as nails..
An easy DIY fix,,,, practice on an old bladder first if your not sure...
And John at SOS sells big pieces of tearid.... good fella
Went into the new-ish AKS store in Scarborough to buy the Tear Aid to diy but Darren fixed it on the spot. Admittedly I'm yet to try it out as it's currently with Neil getting the LE sown but it looks pretty bomb proof. Should be ready for tomorrow's 23knots Freo doctor ![]()
Hi Freddofrog,
Thanks for dropping in today. I can absolutely guarantee that ....................... Neil will have done a shmicko job. ![]()
![]()
Lets cross our fingers and hope for the best with my bladder repair. ![]()
![]()
I'll throw up a pic of my handiwork tomorrow when I get the pics off the camera in the morning.
Good luck with it ![]()
DM
Hi Peeps,
Here are the picks of the repair.
Lay the bladder out without wrinkles and tape it in position.
Second part of the job is to "stitch" the bladder into position with 3mm x 10mm "stitches". This holds it together whilst placing the Tear-Aid. Due to the size of the blowout, I used 6" wide Tear-Aid on the roll.
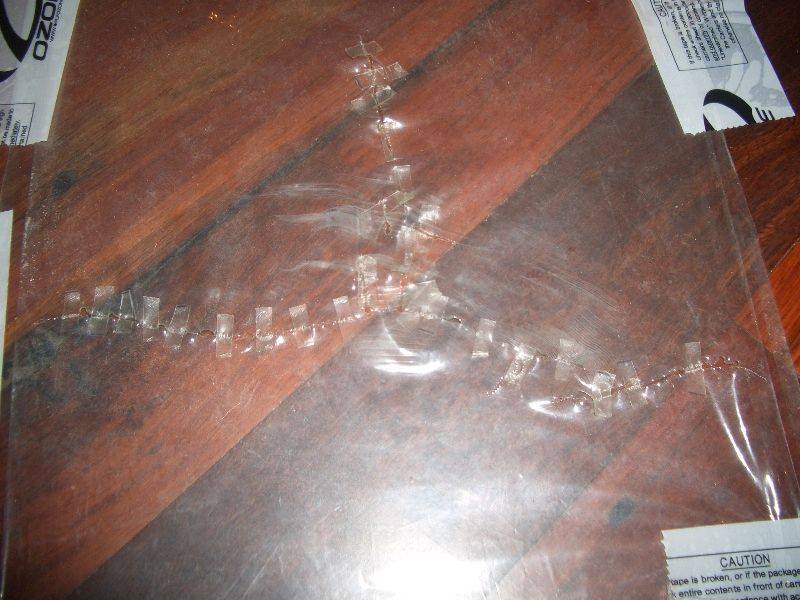
Lastly, a large piece of Tear Aid was applied very carefully without wrinkles creating capillary leaks. When applying large sections of Tear-aid, work around the puitside edge being careful not to allow wrinkles to form.

I also added a couple of re-inforcing patches to the bits where the tears go close to the edge, just to be sure. I'm fairly happy with it.
DM
Woo hoo, so far so good! Had a bit of an twisted bladder issue after the LE was sown but under Neil's expert guidance (2 people grab the ends of the LE and shake it hard) all was good. Was only out for an hour and was very careful not to crash it hard. Not sure if that is long enough to check for small leaks. Probably have a longer session Thursday and we'll see but it's all looking sweet so far.![]()


