Forums > Land Yacht Sailing Construction

build a simple speedpod for your mini

Reply
Created by landyacht > 9 months ago, 6 Sep 2011
landyacht
WA, 5921 posts
6 Sep 2011 8:32PM
Thumbs Up

there is always somebody asking about the seats we build for our minis and class 5 yachts so I thought I would do a step by step with plans and photos.
im teaching somebody to do their own, so this time I did drawings and plans on an improved seat to the one I put on "spirit of stupidity"
this one is slightly narrower in the bow and tucks in at the stern rather than being parallel. this will give a sweeter slightly more rounded shape.
it should suit up to a 6'er and people in the 50-90kg weight range. the max width could be increased if you have a weight centration based at the hips/lower stomach.the rear could be extended to include a complete seat back, but this one will have a tube frame /sling seat like the last 4 Ive built.
this is a laidback set up so if you cant layback or want to sit up this 'aint the seat for you[}:)]
they are the most comfy things Ive made , so I wont complicate the idea further.
basically something like this seat


please dont post questions etc unless you feel they are really important(I may have missed something really obvious like a mast rake angle)
nickrum and TP1 ........dont even think about starting your silly business
I will start with the plan and a material list tommorrow

Nikrum
TAS, 1972 posts
6 Sep 2011 11:15PM
Thumbs Up

Perish the thought Paul, I wouldn't entertain the thought. Just ask TP1. We have been on our best behavior and don't need you causing us grief.[}:)][}:)]
Ron

landyacht
WA, 5921 posts
7 Sep 2011 7:08PM
Thumbs Up

this seat uses 2/3ds of a sheet(2400mmx1200mm) of 6mm plywood. the longest pieces are 1400mm long
Ideally you want a good marine ply( in Australia its stamped BS1088) but you can build with other grades. Ideally you are looking for 5 ply's of wood in the sheet and the glue line between the plies should be black(marine) or brown(exterior grade)
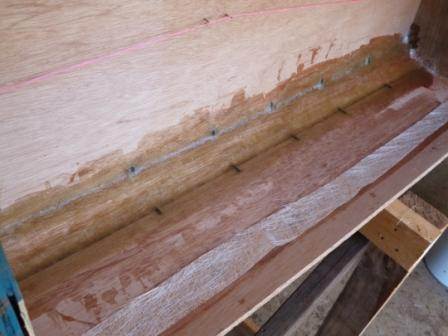
a clear glue line means interior ply and will often only be a 3ply sheet. here are some cleaned edges as a guide to what Im explaining


when i built the pod for green arrow the ply was odd sized sheets from a discarded packing crate and probably only just considered Exterior ply.
the ply for the station frames needs to be 12-20mm,preferably20mm.Chipboard is fine as well for this bit.
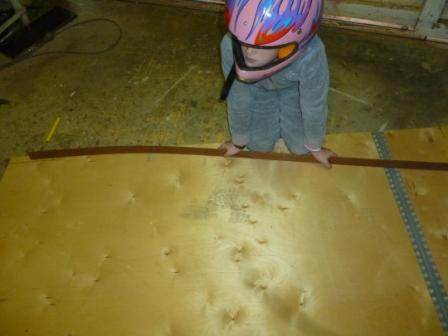
In the construction photos you will see a building frame/stand that is 1m high and built from the planks and bearers that were pulled apart from the pallet that was sacrificed for the 20mm ply.you will need at least 1 piece of timber that is 1.5m long and really straight. this is the base that all the stations will line up on.


Cable tiesabout 50-70 small strong ones, perhaps some little hands to tighten them up ( a favourite job for the kids)
Resins and cloth. Ive used polyester resin, adding 1.5% catalyst as the weather is still cool. on the inside Ive used chopped strand matting cut into 40mm wide strips(about 1msq of light matting)I think its about 250gsm, but not sure, the packs they have in the hardware stores is about right.
on the outside we've used 50mm tape, but only because it was available, chopped strand would have been fine.
some people slice woven cloth into strips to avoid the little ridge that needs sanding off, but I always end up with a tangled mess.
clamps- 5 or 6 good G or F clamps .
nails -plenty of 20mmflat head clouts, or small gauge button head self drilling screws.
tools, mainly woodworking tools, hammer,panel saw, jigsaw,set square,plane or rasprange of sand papers,2m of stringline,drill and bit to suite cabletie holes, screwdrivers.something to sharpen your pencil(that can be dangerous at our shed)

landyacht
WA, 5921 posts
8 Sep 2011 9:28PM
Thumbs Up

Ok some actual numbers.
Ive measured and cut 3 stations. these are temporary internal frames that will hold it in shape whilst the planks are fitted into place.
ST 1 is the front(just behind the shaped nose)
ST 2 is the widest part , set 1000mm back from the front
ST 3 is the rear , tucked in to give a nice exit shape.
These are clamped to a building frame ,which is a simple horizontal frame which is screwed or nailed up from scraps.
the beam that will hold the clamped pieces needs to be straight and untwisted . here are the measurements. note the seat is being built UPSIDE DOWN initially

landyacht
WA, 5921 posts
13 Sep 2011 9:29PM
Thumbs Up

time to mark out and cut that sheet of ply ive used a sheet of 6mmBS1088 5ply .
this is not normal for me , in fact its the first time ive used a real sheet of new stuff . usually I would use offcuts or a handy packingcrate from a skip. the seat panels are 1400mm long and the sheet is 2400mm long
So yes if you built your seat only 1200mm longyou would be able to happily make 2 seats from a full sheet, or even just buy one of those cursed "handy sheets" from the hardware monster


I usually mark out and cut each sheet as I go rather than marking out them all and then cutting.the curve of the bottom panel is created by sitting some small nails into the measurements and the bending a fairly stiff batten around the nails and marking with a pencil.
a handy helper is always good. this was done on a European machinery box

.
The stations are clamped in place on the building frame. Ive lined the centre lines up with the edge of the frame and added a string line to the base to keep it all true.


the first panel to be fixed on is the bottom( which is on top)but i'll do that next time as its been a long day

landyacht
WA, 5921 posts
16 Sep 2011 8:49PM
Thumbs Up

now the bottom of the seat is nailed into place on top I usually use 3/4"clouts( flatheaded) but you could use a small self drilling screw. I nail the nail through a small scrap of ply firstand then nail it to the sheet. this allows you to remove it easier later on

once the bottom is on you then add the vertical sides. once these are in place the edges where the inbetween stip is to be fixed can be planedto give a neater fit.
a surform ordrawknife would also give a suitable finish.
once the inbetween plank is fitted it is time to start drilling some small holes along the edges for some small cable ties. note that all the tails are pointing out.
this is because you will be fibreglassing the INSIDE of the seat first

you will see in the earlier drawings I showed an intermediate 280mm long between station 1 and 2. this is to stop the bottonm over-bending when the piece is fixed to the stations. once all the cable tie are in place this can be removed.

landyacht
WA, 5921 posts
19 Sep 2011 7:29PM
Thumbs Up

So youve cable tied it all together , now comes the moment when you have to undo the clamps and tip it on its side to glass the inside.
you did clamp it didnt you?[}:)], you didnt nail it to the frame or screw it and now you cant get the drill in to undo the screws, base frame is now put to use as a nice high work bench to hold the job in place like this


now you can start glassing the inside seams. Ive used polyester resin and a light chopped strand matting. as the matting is only light Ive used 2 layers, sliced up into strips 40mm wide. the wood is wetted out with a coat of resin, then the cloth strip, when the first strip is wet a second strip is layed on and lightly wetted.
I then use a groove roller to work the cloth and resin onto the wood and drive out any air bubble. If you want to you could rough up the wood to be glassed, but this ply was rough enough on its own


a word of caution, make sure that the strips of matt and resin dont stick to the framing stations as you dont want them to be stuck in the seat when the time comes to remove them


Im told epoxy reinn will stick better to the wood , but Ive trialed that and there wasnt much difference. some folk would glass the entire surface , but as the yacht isnt going to be circumnavigating any continents I cant see the point. It would just add weight.
If anybody has any questions , now would be a great time to have some discussions , before I start showing the fiddly parts of the build

desertyank
1260 posts
28 Sep 2011 10:57AM
Thumbs Up

No questions about what's been posted, I just want to see the rear/back portion of the seat now!!!

landyacht
WA, 5921 posts
28 Sep 2011 8:01PM
Thumbs Up

the next part of the build is the nose!!! bad luck. here is an opportunity to do something different or bizarre

I literally cut out all the peices from scraps and cable tied the lot on . once it was all tight it felt really tight and strong. next the inside is glassed with the same technique as before. the nose extends the length of the seat by about 80mm

BUT its really tricky to do , so you need to thing about manouvering the job to suit your working height. I simply clamped it to a ladder. its was rather easy to do

you will also notice that Ive sarted thinking about some re-inforcing for the rear of the seat and the rear sides where the back and headrest will bolt on. this is also a great time to consider placing re-inforcing the mountingpoints for the frame.
they are simply pads of ply glued on then glassed over on the inside

desertyank
1260 posts
5 Nov 2011 6:25AM
Thumbs Up

Ahem! Hellloooooooooooooooo.... I know the sailing has been good, but this thread is a real cliffhanger. Do You have time yet to finish the lesson landyacht?[}:)]

Nikrum
TAS, 1972 posts
5 Nov 2011 9:40AM
Thumbs Up

Desertyank you will have to forgive he (Ly) and TP1, they are typical Aussie Blokes they neither have enough blood in their systems to run two heads at once nor do they have an attention span better than that of a Common House Fly throw in that and a Slab of Tins and you wont get any sense out of them for a month[}:)][}:)].
Ron

landyacht
WA, 5921 posts
5 Nov 2011 6:52PM
Thumbs Up

sorry its slowed down , the next series of photos were hidden away on wifeys computer,(still are ) but I found a missing link to get going again . thanks for prompting me.
all the internal glassing has been done so Ive pulled out that final frame and started smoothing out all the edges/bumps on the outside . any gaps have been filled befor I glass the outside, the outside is glassed using 50mm woven tape,.
some use diagonally cutcloth which i find tends to just tangle up.there is no need to completely cover it with cloth as this would just make it heavierand need more fairing.

you will notice the internal side braces that have been added to stiffen the shape and will also be used to attach the seat sling later on.
once ths has been sande and glassed it is ready to fit to the yacht

landyacht
WA, 5921 posts
7 Nov 2011 9:17PM
Thumbs Up

now for the backrest!!!!!!sorry to keep you waiting dessert yank.
my inspiration and therefore credit for the back rest has to go to Hikos windsurfer boom backrest. pure inspiration and recycling genius

the back rests I had put on the 2 nappy rush minis wasnt adjustable and tended to get damaged and were really fiddly to get right. so i went with hikos principles . the first attempt wasnt so good because I made it too narrow,and the bends were all wrong and dug into the armpits . i ended up with a set up that comes out of the yacht horizontal and then curves upwards rather that a tight bend. there a 3 failed set ups in the pile to be re-used

the frame here is 650mm overall but was originally cut longer to get a sweet fit. the tubes are fitted to the yacht using some simple mounting plates that are bolted through the sides of the seat and a nut welded to the mount locks the tubes in position. I plan to turn the mounts over as i have a couple of bruises from bumping those locking bolts. the tube is 1.6mm wall,25mmod galv electrical conduit. If i was putting this set up on a larger class5 yacht i would consider a 32mmT6 ally,or maybe a smaller size exhaust tube,as the unit wouldnt be holding any sheeting.you can see that i mounted it forward of the rear of the wood by about 15omm . this is because i forgot to cut off the excess wood when i first started building

from above you can see the rear bracing to give the whole thing some stiffness. the rear is 25x25x1.6mm RHS. this gives good rigidity whilst being easy to weld up and makes a great place to mount the videao camera. the bracing rod was just 5/16 rod. width at the rear was 250mm

heres a rear view cos it just looks cool
but it gives you an idea that the rear comes up to the same height as the top of the wooden part of the seat


The material part of the seat is from a trashed trampoline.and simply a single layer sewn as a narrow hammock. the importance of that little internal wooden brace can now be seen. and it looks stylish and cool


finally a side view of the rear of the hammock showing the fitting pocket that holds it all on the back of the seat,and the sewn pocket to take a cushion. the idea was to make the cushion as hard or as soft as needed.
with this one my helmeted head is resting on the cushion when sailing. in the Andrew Bates perpetual marathon race I was comfy and rested throughout the race , even when capsizing, whilst the yacht was constantly being smashed around over the potholes.
Now you can ask lots of questions, as this is kinda the end of the lesson

cisco
QLD, 12321 posts
8 Nov 2011 12:22AM
Thumbs Up

landyacht said...

sorry to keep you waiting dessert yank.


What!! Are you going to gobble his head off after the Sunday Roast??

Fruit Salad and Ice cream would be more appropriate.

ledzephyrlin
WA, 101 posts
8 Nov 2011 1:04AM
Thumbs Up

that seat must be functional plus. i could'nt even use my headrest on that surface,felt like i was at a metal concert. if your not glassing the entire outside surface, how do you get it looking so smooth and even, what are you using to fill the gaps?,and why do i ask so many stupid questions???

desertyank
1260 posts
8 Nov 2011 8:09AM
Thumbs Up

Thank you, kind Sir

If I get motivated, I might just give my mini a new rear look.. Nice work all around. Since I don't have a busted trampoline handy, what other type of material do you recommend I look for?

Thanks again for the latest lesson, Professor

aus715
VIC, 58 posts
8 Nov 2011 8:31PM
Thumbs Up

Pet Mesh.

A nylon reinforced polypropylene 2mm mesh, in black. Many hardware chains stock it as a small roll and it is a great alternative to trampoline mesh. $25 in Aus at B'. You can 'weld it' and edge-over the seams with a standard laundry type iron and then insert eyelets. No it doesn't wreck the iron, so She doesn't need to know...

Recumbant trike racing resource.

Pics tomorrow if that's helpful.

Hiko
1229 posts
8 Nov 2011 5:40PM
Thumbs Up

The blue stuff on the yacht in the pic above is acrylic canvas that is used for sailcovers and the like Seems to stand up well No issues with it so far

desertyank
1260 posts
8 Nov 2011 7:57PM
Thumbs Up

aus715 said...

Pet Mesh.

A nylon reinforced polypropylene 2mm mesh, in black. Many hardware chains stock it as a small roll and it is a great alternative to trampoline mesh. $25 in Aus at B'. You can 'weld it' and edge-over the seams with a standard laundry type iron and then insert eyelets. No it doesn't wreck the iron, so She doesn't need to know...

Recumbant trike racing resource.

Pics tomorrow if that's helpful.


Yes please on the pics

landyacht
WA, 5921 posts
8 Nov 2011 9:01PM
Thumbs Up

desertyank said...

aus715 said...

Pet Mesh.

A nylon reinforced polypropylene 2mm mesh, in black. Many hardware chains stock it as a small roll and it is a great alternative to trampoline mesh. $25 in Aus at B'. You can 'weld it' and edge-over the seams with a standard laundry type iron and then insert eyelets. No it doesn't wreck the iron, so She doesn't need to know...

Recumbant trike racing resource.

Pics tomorrow if that's helpful.


Yes please on the pics

never heard of it , will look tommorrow, i was going to buy a replacement trampoline deck.


landyacht
WA, 5921 posts
8 Nov 2011 9:08PM
Thumbs Up

ledzephyrlin said...

that seat must be functional plus. i could'nt even use my headrest on that surface,felt like i was at a metal concert. if your not glassing the entire outside surface, how do you get it looking so smooth and even, what are you using to fill the gaps?,and why do i ask so many stupid questions???

im a tight wad with the fillers. under the glass ,where there were small gaps to fill before glassingI used cornice cementyou may have a bag or 2
on top I mix up about 100ml of polyester resin, 2-3% catalyst then stir in talc(cheap woolies talc) till i get a nice smooth bog that ALMOST flows on.
. It sands well and has a nice curing timeand takes automotive spray on putty,then etch primer well.
its a cheap alternative to the microballoons etc Our nearest specialist fibreglassing store is 600kms away


aus715
VIC, 58 posts
12 Nov 2011 8:49PM
Thumbs Up

Pics of the pet mesh.


Pet Mesh, from Bunnings in the section where you buy flywire. Comes in a roll.

We make seats for recumbant race trikes, with eyelets inserted into the folded sides. The result is a really strong seat fabric, tensioned over steel pipes with either a rope or cable ties. Water proof and washes up nicely. Glossy black in color so it looks fairly decent once installed.

The sides are just folded over and 'heat welded' using a household iron and baking paper with lots of pressure to get it to bond. Then use a soldering iron to pierce holes and apply the eyelets. Without these it would most likely rip, but not straight away. You can see where we cut the sides out for steering arms and it didn't tear up at those points. All made by students at school to our own specs. Cost was around $30 or so and lots of fun to make.

landyacht
WA, 5921 posts
12 Nov 2011 8:28PM
Thumbs Up

found it , used it really nice stuff to use . i was able to sew 6 layers with a peice of webbing in the middle. I made a trampoline for "spirit of christmas"
top effort AUS 715

aus715
VIC, 58 posts
13 Nov 2011 6:45PM
Thumbs Up

I like the mesh as it is not something 'marine' that one has to fork out for. There is a bit of stretch in it too which is quite good. Shock/bungee cord of around 10mm zig zagged through the eyelets really gets it drum tight but it lets it sag enough to mould into your lumbar and upper back.

Another solution we have used recently is Coreflute with eyelets and cable ties. Also really comfy and even cheaper!

Andrew

partially installed.

grlynch
QLD, 208 posts
13 Nov 2011 6:35PM
Thumbs Up

Ow

(fell off chair trying to see details)


Subscribe
Reply

Forums > Land Yacht Sailing Construction


"build a simple speedpod for your mini" started by landyacht