
After mucking about with a heap of simmons style ideas i really thought that the tomo vangurd shape had a lot of things going for it as a sup.... So anyway after a couple of days of shaping it is getting there. Still a fair bit of tidy up work to do.
I realise this type of shape is not everyones style, that is cool. I couldn't originally bring myself around to to shaping a shovel nose style board but as i kept playing with volume and rail shapes in aku shaper it became obvious that a round or pointed nose was not going to achieve what i was after.
Dims at the moment are 7' 11" x 29" x 4 1/2" tail rocker around 2 1/2 inches (will add a 1/4" single concave in tail)
around 135 litres


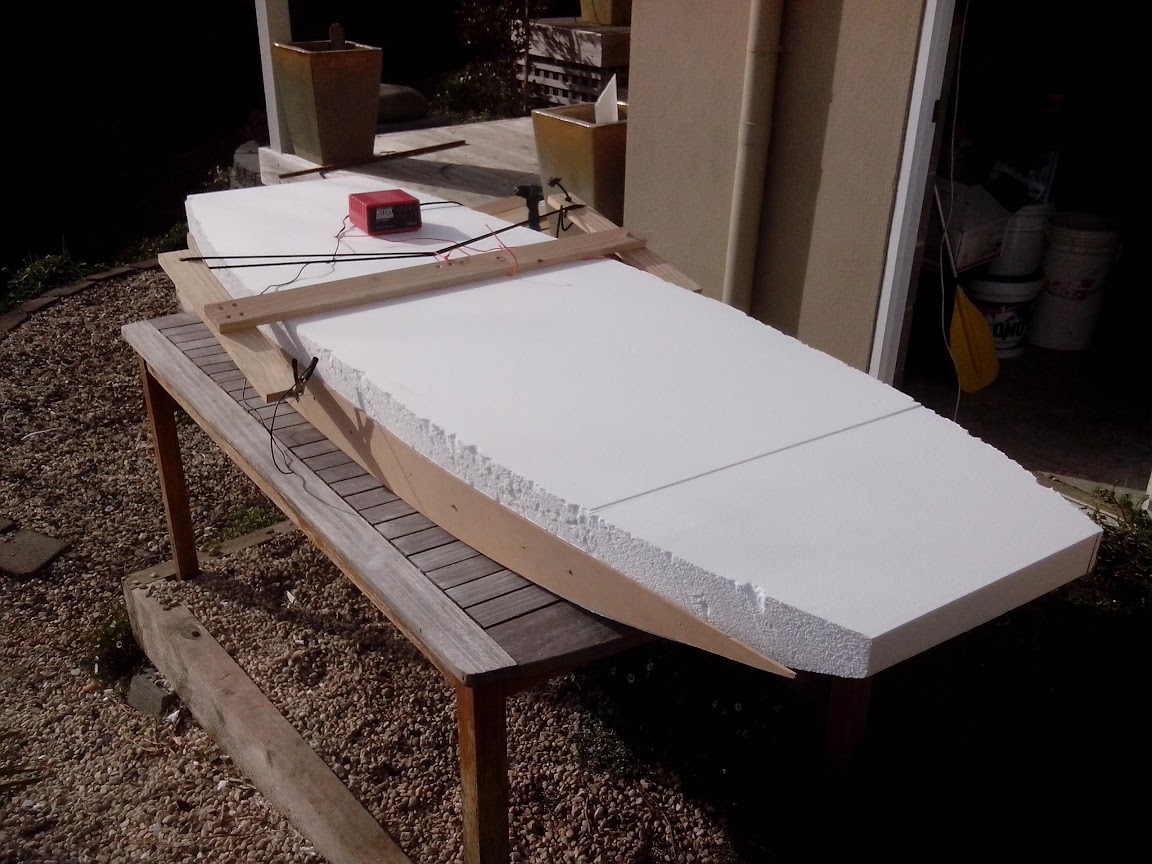

Will finish shaping tomorrow... then i gotta figure out how to get a warm enough workshop to glass it. Not sure my wife & kids would be so keen on me glassing it in our lounge room!
I am doing a innegra/corecork/carbon sandwich, still got a few glassing tests to do.
Cheers Chris
looks very interesting, about the same volume as my sub vector, might have to look at something like this
Jarryd
My son rides a Tomo vanguard and funny thing, he said to me just the other day, "You should get a sup like this".
He loves 'em.
Let us know how it goes.
Pete
Hi all,
Thanks for the encouragement!
I am looking at it tonight, and wondering whether to take it down from 29 to 28 inches. It seems to have a hell of a lot of volume. for its length.
Its looking a bit chunky in the nose and tail, am trying to take the thinning down process slowly so as i don't want build a sinker!
4 /12 thickness is looking a bit like a barge, am planning on doing the step rail thing, just not sure how to shape them.
Not claiming my design has any of the refinement of the Tomo boards but is inspired by him.
If anyone has some suggestions on this they would be very welcome!
Planning on quadfin with minimal toe in.
I reckon it will take me a couple of months to glass it.
Hey Robdog,
Is that your son ripping it up in that video? If so you must be a proud dad.
Cheers chris
Hi laceys lane
Do you reckon I would be better of doing the rail to thin it instead of step rail?
Cheers chris
What about just doming the deck more to thin the rails out? Thats what I get my shaper to do on my short boards.
I love the transfer of the concept to SUP.
What layup are you planning to do?
I must say I love the trick to get thin rails via a domed deck, or semi domed (flatter in the middle with the dome part towards the rails)
Hi Bertie
foam is hd styrofoam,
Planning on innegra first layer, corecork nl20, then carbon fibre with a thin glass sanding layer over the top. Prob with some extra carbon under the deck area.
Got lance the australian probox stockist to sort me with fins and boxes, and got a few of those liftsup handles from the us. (Lance really sorted me with fins for my nalu 10.65 i would recommend a chat with him about fins).
Hi colas thanks for you advice on doming the deck, 2 positive comments for going in that direction is goo cause i was not looking forward to cutting in a set of steps.
Cheers Chris
hi, what those other guys said. a step rail board doesn't seem balanced or something. no very stable and catch water/edges in chop.
a chamfer type rail is a option too
cheers
Select to expand quotehighvolume said..
Hey Robdog,
Is that your son ripping it up in that video? If so you must be a proud dad.
Cheers chris
Yes on both counts. Hope the board turns out well. Keep us informed,
Pete
Select to expand quotelaceys lane said..
hi, what those other guys said. a step rail board doesn't seem balanced or something. no very stable and catch water/edges in chop.
a chamfer type rail is a option too
cheers
Hi guys,
I inherited a no name sup from a mate with stepped rails and I have to agree with the comment above. It ordinarily measures 28 wide but once you measure from where the rails come in then the board width starts at 24 inches. When I first started using it, it was horrible in terms of stability. Right now I am used to it but I went out today when the water was really choppy and you do notice the extra interference from the water and how it seems to collect more water which goes over the deck when really it shouldnt. I would definitely revisit this part of the design.
Cheers Ozzie
PS...great video
Hi,
Thanks everyone for your input it's much appreciated.
I finished shaping the rails today and stayed away from stepping the rails. It is tricky to resist the temptation to slim everything down as if shaping a prone board.
The vanguard has a really thinned out nose (in profile), and I have left mine a bit chunkier, and do you think it is better to keep floatation or thin out? I will post up a picture of the nose shape asap.
Cheers chris
I's say you need flotation up front (between the handle and the nose) for comfort, but at the same time front rails that penetrate water well, so that they do not "block" against the water when paddling, so not boxy but more like the kind of smooth curve you would expect on the front of a fin.
Hi Bertie.
not a lot of action. have just finished shaping on the weekend and have spackled the board.
Am toying with either:
A: do a few test layups on some foam, get my vacpump pressure set right, do a bit more web research etc etc
B: roll out a heap of fabric, mix up some resin, cut cork to size & bag it straight up & cross fingers
also wondering whether i should route in hd foam inserts for fin boxes, handle and leash plugs?
...of course i know what i should do...but wife is away for a week could be time to do a bit of vac bagging on the dining room table!
Cheers Chris
I'd definitely rount in HD foam for fin boxes and handle. Less chance of damage, harder for water to ingress, and will improve longevity.
If the board was a proto throwaway i wouldnt bother.
Yes do your test panels and do some dry runs with the vac bagging. If your not doing this stuff everyday it will lessen the anxiety.
I thouroghly recomend not using the dining table.... until the board is in the vac bag and pumped down ![]()
Are you doing a 3 or 4 shot bagging layup?
What did u use for spakle? I'm not too fond of this concept tbh.
Hi Bertie,
I used this red devil brand spackle, which was suggested on a couple of sites. I just went to the local mitre 10 and picked up the different wall patching products, the red devil was really light , where as stuff like spakfilla was really heavy. I am not entirely convinced by the concept either... but went for it any way. Seems like a nice hard surface once sanded, i think the surface might still be porous enough for the resin to key into but not as much as uncoated.
Do you know what kind of foam i should use for the inserts? (i also saw someone on swaylocks talking about using balsa for inserts, i don't know if balsa is water repellant or if it soaks up water)
Planning on: glasssing bottom first, innegra and cork in one go
then deck - inngra and cork one go
then one side carbon
other side carbon + thin glass sanding layer
then finla remaining glass sanding layer.
I want to go for the starboard style brushed carbon look and then airbrush pinlines and graphics over the top.
I have my blank sitting inside the house at the moment and am thinking i will put a homebrew beer heater belt on my epoxy drums to keep them warm in preparation.
Cheers Chris
Sounds good Chris!
Dont use balsa it is a sponge! Use Divinycell or any PVC foam with a density of 80-100 kg/m3 (80 is best value for money and still light). Corecell is good too.
Try your local boat builder and ask if they have some off cuts you can pinch. you might have to stack a fey layers on top of each other if its thin but you can get it in up to 25mm thick sheets. when you drop in the fin blocks of HD use a little glass inside with the bog mix for extra strength. Good idea around the fin plug too, but dont bother at the handle.
For the final layer put black pigment in ya resin then the a white pigmented filler coat to get the brushed look. (or is it vise versa?)
I guess the spakle is to reduce the amount of resin being absorbed by the foam. I think this is most important if you are not using a wetout table where you can control your resin ratios very closely. I think its best for a basic wetlam job to keep the weight down.
Remember to take lots of photos as ya go! but dont drink too much homebrew as you lam!
Simon from Deep also recently made a vanguard inspired SUP, that he surfed in the Coast of Origin comp last weekend. I think his is 7'4 x ?
The way he way surfing it made it look like loads of fun!
Pretty sure there was a thread on it about a month ago? Might be interesting to see how the 2 designs compare.
Hi All,
Just thought i shlould put up an update on progress of board for and interested diy'ers

This was the spackle i used on the board, it seems like it is one of the more popular brands to use on the swaylocks forums.

Quick test of a bit of foam in a bag to check vac pump setup was working okay

Small test section of the laminate for the board, the cork goes super hard once sandwiched between the innegra and carbon.
Innegra by itself seems pretty flexy
Carbon and innegra is heaps stronger.
Cork between the two seems heaps stronger, there is no way you can get it to bend of push in just using your hands.

Board in bag after skinning bottom with innegra and corecork, have just released pressure and sat board by windows to cure in heat for a few days. It's actaually over 20 in Hobart at the moment!
Stuff to work on:
??? Vac Bag was leaking a bit of air, got to pressure ok but motor had to run every 2 minutes or so to maintain.
Might have to try using vinyl cement on bag
??? Find out best way to glass in leash plugs
??? Test feathering cork with sandpaper to work out how to blend the skins together
??? Innegra is hard to wet out compared with other fabrics i have used, will have to practice
??? I weighed the Innegra and mixed up the same weight in resin plus 10% and came up a bit short, had to mix more as i was going.
I am thinking i might try 3D printing a fin mould and have a go at laying up a small nubster centre fin.
Just got a new 3D printer for school which is going pretty good

Probably will be 2 weeks before I have time to get the top skin on.
Cheers Chris
Slowly Getting somewhere with the build.
Have now added 2x carbon skins to top and 1x carbon to bottom.
I did the deck skins first 2 layers at once and then bagged. I used the proper fabric to diffuse air in the vaccuum bag which looked like polar fleece and was about $14 per metre. This worked fine but was stuck to the peel ply when i puled it off.
For the second skin (bottom) i used cheap shadecloth ($5 per metre) as recommended on this site. This seemed easier to set up and seemed like it was getting the vac more even around the board.
I was worried about the laps on the bottom layer looking dodgey, so i masked up the board where the i was going to cut the laps to. It turned out i needn't have worried too much as once the carbon is vacced down there is only a really small ridge where the lap stops. The masking tape did make it a bit easier to use as a guide for cutting the lap. I did this on the fabric after i had it wetted out. Lost my good scissors in the excitement and had to use a crappy set to cut the laps but worked fine.
Now leaving the board in the lounge for a few days next to the windows to cure, will start sanding and filer coat on the weekend.

Masking off lines for laps

Board in bag with shadecloth breather

another view of board in bag, moved it out of the sun as the day heated up

ripping off the peel ply, all looking good, board has a shiny patch of resin in centre...not sure why but think i added more resin to this are right at the end of the job

board has taken up residence in lounge until I recieve too many compaints from family.
now onto fin boxes handle and finish coats
Cheers Chris
The trick with the bagging is the materials you use.
I ALWAYS use the following
1. Peel ply. (can be bought as Nylon from textile trader etc, used for lining stuff, get natural colour $3/m)
2. Perforated plastic film. I have stuff I've been re-using for 10 years.
3. Wadding material as an absorbant material. As used in a blanket. you can get a few different weights I have bought 450gsm for about $5/m before. I think it is Polyester. I've also seen chuz cloth type stuff used and heard good things about using quality absorbant paper towel too. different thicknesses will bleed of different amounts of reson.
4. non perforated film. This stops the resin bleeding too much but also prevents the bled resin from sealing off areas in the bag and ensures very good vacuum distribution and a top laminate.
5. Another layer of the wadding as a vacuum distribution blanket. You can re uses this until excess resin wrecks the big piece then use as a bleeder on smaller parts.
Hint try to use the largest continuous pieces you can of the consumables. overlaps and pleats can indent sor leave witness marks on the part.
I Always run the vac through a piece of conduit with lots of holes drilled in it wrapped in blanket that runs down one side of the bag to ensure if you have small leaks the vacuum is distributed as evenly as possible.
I've only used shade cloth for bagging the foam sandwich in before. Never used it for the laminate. You loot to mave much sanding and fairing. but that was for making the bonnet of a Nissan 260Z with a huge inbuilt bulge for the huge windsor motor shoehorned into it!
If you are careful you can minimise the wrinkes as you pull the vac down, but choosing the right bleeder and blanket also helps.
I like the products from Lavander, but have found some awesome stuff elsewhere too.
Keep it going I wanna see the end product!!
Hi bertie,
That makes sense, I had been using a double layer of peel ply plus the breather to soak up resin. I only used a single layer on this plus the shade cloth didn't absorb any resin. I the gloss patch looks worse in photo than in real life. This is my first go at this, but seems every step has something new to teach me.
Cheers chris
Hi All,
finally finished!
spayed with montana black spray cans sanded back and then clearcote done with durepox.
still need to tidy fit of fins in boxes & make a grab handle for the tail (plus remove masking tape from leash plugs)
weight is just under 7.5kg, litres is around 135-140
finished size is 7"10 x 31" have not run the tape over width to see how much the cork sandwich added.
Time to do some testing, thanks everybody for all your help.
Cheers Chris W


HI Bertie,
thanks for the encouragement and advice.
There were definately times where i thought i was never going to get it finished.
When it comes to board construction, it is certainly an eye open how long everything takes when you are doing a one off. Board pricing certainly seems reasonable after doing the diy approach.
Not sure of finished costing (prob around $800 but had to buy 2+) boards worth to make it economical, but if you want to keep something like this on budget you need to try and pay wholesale prices for stuff as much as possible.
Final design shares similar outline and tail rocker as tomo vanguard but is a lot chunkier in volume and rails. Have kept the rails pretty hard all the way through with a bevel rail for the front 2/3 of the board....anyway will test asap.
Cheers Chris
looks pretty sweet mate, love reading how you made it step by step, as i will most likely never make my own board
would love to know how it surfs
Jarryd


