
Weather | Buy&Sell | Forums |  |
Weather | Buy & Sell | Gallery | Forums | |
OK, here we go...
This is how I built the 4.8M flat water paddle board I launched last weekend.
Some details first:-
Length 4800mm
Width 700mm
Where I stand 2450mm from the bow
Balance point 2650mm from the bow
Weight 20Kg's


.
These are all the pieces arranged on the garage floor, ready for assembling. I had them CNC computer cut to a design I did in the MultiSurf design program.

The pieces epoxy joined with the enlarged jigsaw joints. I found these just a little tight and each needed a slight sand before tapping together with a mallet and a block of wood.

This shown the bow section with the appropriate arc cut into it to form the bow rocker and nose Vee.

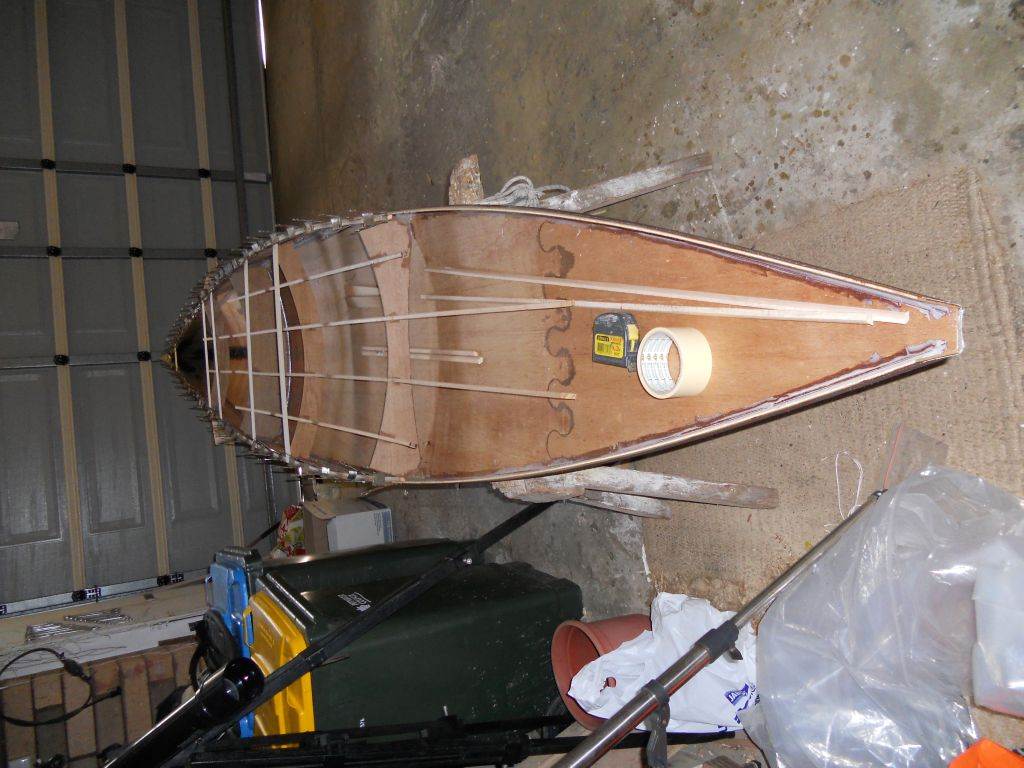
This shown the arc in the bow being pulled together with copper wire and epoxied together with glue and carbon tape to hold the angle. This angle is very important as it sets up the rounded bow sections and if it's not strong the bow won't develop it's desired shape.

.
This group of photos shown the side walls being installed. Once again the angle they join bottom panel is very important as when all the curvature is put into the bottom panel the side panels are in a different orientation than when the panels are flat. You can see the temporary frames spaced along the board to set up the angles correctly. This angle also helped force fullness into the bottom panel so it needs to be strong. I put big fillets on the inside and a layer of 2" glass tape the whole way around and a second layer of 3" tape in the front half where the maximum curvature occurs.


Nice work.
I think this equates to 15'9 x 27"1/2.
Most people are more familiar with feet & inches, with regard to surf craft / SUP.
Once the side panel joins are cured you start to fold up the hull shape by pulling the sides up to their correct angle. I did this with clamps at the chine level. once the hull has been bent I installed the bulkheads. Only one of the bulkheads goes from deck to hull, most of the hull section is unsupported, relying on the compounded curvature to hold it's shape. As you can see from the final picture, this compounding can induce a huge amount of stress into the hull (and the builder) and the bow area where it meets the deck was the most stressed. I basically used 2" masking tape at about every four inches along the bow section ans just kept tightening the tape and moving to the next one until it was in position. It popped on me once, that's when I decided to use heaps of tape as well as the thin spectra line you can see.


That's awesome.....well done!!!!!
You must have put a heap of time into design and planning it all out.
I love the little jigs you used to fix the sides at the correct angle.
Finished product looks great.
OK, where were we...
This group of photos was taken of the installation of the wood bead around the gun'hles to give the deck something to glue to.
You can also see the floating deck frames and deck stringers.
The bow is also still heavily taped to stop it from peeling open at the unsupported area at the front of the deck.
I glued a small piece of ply into this area to anchor it all in place.


Hi LL
Yeah, it's more a dinghy building concept and it only works for certain hull shapes. I like it because it's a bit of a trust build, even though the computer tells me what it's supposed to look like, slight differences in the side angles and stiffness of the ply will affect the outcome. It also involves a lot of tension in certain places. Wait till you see the photo of me putting the deck on.
The final batch of photos.
You can see the amount of stress induced into the deck panel by the amount of weight I had to use to set it into the deck stringers.
This makes the board incredibly stiff rather than needing lots of bulkheads and stringers to stiffer it up.
As it's a fun board I've fitted a centerline wheel in the stern to allow me to wheel the board to the water rather than driving down.


