Just wondering who has been using cam batten windsurfer sails on land yachts and what solutions they have found to modify the sails masts etc to work/fit on a land yacht?
Specifically solutions that keep the cam battens not re cutting the luff to remove the battens
I have seen the work that Chook and Greg from Esperance have done over the last couple of years.
Before I jump in to make my own mods I'm just checking to see what other knowledge is out there.
By solutions i mean:
- methods of re-cutting or modifying the sail,
- modifying / strengthening the mast,
- attaching mast to yacht
- Boom and sheeting systems
I was thinking something like this.
This would require the fabrication of:
-a base plate to bolt your mast base
- extra long pulley whip for sheeting.
This set up would be easy to convert yacht back to race spec.
Ideally would love to get the sail as low as possible however this arrangement doesn't require your steering to be adjusted and keeps the wishbone boom as close to the "mini support mast" as possible.
Using the 'mini support mast' you won't need to use stays to support the rig.
Attaching the 'mini support mast' to the wishbone boom can be done with a piece of spectra or possibly a plate and bolt to reduce rig tilt to leeward.
The best set-up of uncut windsurfer sails if seen and sailed is chook and greg's minis with the internal mast post however they lower mast section needs additional reinforcing.
Anyway just some ideas to play with.
Cheers
Ben.

The esperance BA set ups seem the simplest to me . you need to reinforce the bejesus out of your correct stiffness carbon mast and have an internal rather than external support. . dont forget that cams are out in class 5. thats one rule we havent yet relaxed ![]()
Select to expand quotelandyacht said..
The esperance BA set ups seem the simplest to me . you need to reinforce the bejesus out of your correct stiffness carbon mast and have an internal rather than external support. . dont forget that cams are out in class 5. thats one rule we havent yet relaxed ![]()
I think the guys want to go super fast "landyacht", not only race their 5's. ![]()
![]()
Greg and I only use this setup on our mini's anyway. ![]() Nice that you 2 Lefroy guys are giving uncut sails a crack!!!!
Nice that you 2 Lefroy guys are giving uncut sails a crack!!!! ![]()
You only need to re-enforce the mast externally when they have been extended at the base of the carbon masts Paul. ![]() We have found it easier to add an extension to the tip of the mast, rather than wrap up a 7 layer carbon 600mm base extension that's grafted onto an existing mast. That's a lot of work and expense.
We have found it easier to add an extension to the tip of the mast, rather than wrap up a 7 layer carbon 600mm base extension that's grafted onto an existing mast. That's a lot of work and expense.
A standard carbon mast with the correct IMCS to match the sail, with a 3mm x48mm internal aluminium stiffener as far as it can be inserted up into the taper and retained with a countersunk head bolt head inside the very bottom of the mast works well.
By re-enforcing the mast this way means the "stiffener" can be removed if it corrodes or gets bent. Scaffold aluminium is thinner/lighter and seems to flex less for this job.
The mast tip then can be adjusted for length/height easily to match the luff of the sail by adding longer internal bits of dowel on top of the mast inside the extension tube so the sail just clears your shoulder when fully sheeted. Just as they do with windsurfing tip extensions.
We mount the masts on a hollow 4140 steel stalk bolted to the yachts chassis, so a fully rigged/down hauled, mast/sail can be simply slipped over the stalk when testing/swapping sails and this works well. Usually we just use the one sail/mast combination for the particular wind being experienced on the day. Windsurfer sails have a much larger wind range anyway, so not often we change sails during a session.
Our windsurfer mast is internally supported only by the stalk on or chassis. The mast rotates on this using the internal strengthener as it's bearing surface.
The boom remains in a fixed position on the mast as the whole setup is all free to rotate as a single unit. Mast boom and sail pivots absolutely friction free on the stalk.
Centre sheeting is a complete waste of time as you already have the standard downhaul setup (as used on the windsurfer sail in it's conventional rigging) and couldn't possibly be down hauled hard enough with just centre sheeting.
We use a 6 to1 down haul with a huge amount of effort applied to this downhaul, probably around 80 to 100 kgs of force still required to the 6/1 on large sails. ![]()
Most masts will "set" with around 1000mm of rearwards curve in the mast, using downhaul only. ![]()
The sail must be down hauled so there are no wrinkles at all in the sail before any sheeting pressure is even applied.
So the best sheeting leverage is simply at the rear of the boom where it all makes sense and much less effort is required. ![]()
You can sail an uncut windsurfer sail that is rigged correctly, in almost twice the wind strength of a similar "conventional/old fashioned" land yacht sail. ![]()
We have proved this on many occasions.
When the blokarts were over powered on 2mtr sails and were quitting sailing due to the extreme wind gusts in Kingston South Australia early this year, I could still easily out run them with much more ground speed, having fun in my mini fitted with a 6.6 mtr sail still averaging in the mid 80's kmh.
Quite a few guys took my mini for a run with this sail in these conditions and couldn't believe how easily it handled the wind gusts. When you sheet out in a gust, the sail is absolutely drum tight, so it's impossible to get it to flap and the top simply weather vanes/twists off till the gust eases.
This mean that only 3 sails 5.5, 6.6 and 8.3mtr cover me from 3 to 40+ knots. (I have other sizes that I'm still testing but only take 3 to events.)
Hope that explains the guts of it.
Hi Chook
Sounds like you have it sorted. And yes since we only race 1-2 days a year is seems a bit silly to stick to the class 5 spec for the other 363 days.
The plan is to transpose what you have done onto a class 5, keep it simple to change back to the standard class spec to appease the old dinosaurs on race day.
The rest of the time enjoy sailing in a wider wind range with fewer sails that perform better.
I was thinking about fixing stays to the mast at the level of the wishbone boom just for something different but what you describe above sounds pretty simple. Just waiting for my new 7.1m race sail and matching mast to arrive and ill start experimenting.
I think your idea of the stays is a great one mate. Would make the change back to class 5 when required a very simple one.
John what we have done in Esperance is by no means the do all and end all of "mast support design". Far from it......It just works for us guys.
Your idea or as Ben has sketched it would be fine too all without access to a lathe.
The biggest hurdle doing it with a stalk of this kind, is all the initial machining involved. Once constructed and the right angle sorted out it's dead easy to rig up.
It is a fair bit of work the first time to lathe up the stalk and it's associated mounting bases to suit.
It's prepared/chamfered preheated, weld it all together then letting it cool very slowly completely covered in a bucket of builders lime for a day or so.
Here is a shot of the bits that make up ours. The overall height of the stalk is 360mm including it's red base plate. It's made from 50mm x 31mm, 4140 grade Hollow bar.
The shinny surfaces are where the masts internal alloy stiffener is supported and these are both 25mm wide (both top and bottom). These bearing surfaces are 1mm smaller than the "Internal diameter" of the stiffener. Between these 2 surfaces the stalk is machined down 1.0mm smaller in diameter to reduce friction and so the paint protects the surface too. The bottom flange (the actual mast stands on) is the original diameter of the 4140 hollow bar at 50mm

This is the stalk base and is 75mm x75mm by 12mm Flat bar. The hole is machined out favouring the 2 RH bolt holes. The reason for this is so you can still remove the rear 2 cap head bolts on a stalk that is raked back. (The right hand side of the photo being the rear of the stalk in this photo)

This is the base plate that is welded onto the chassis of the yacht raked back at 3 degrees. The cap head high tensile bolts are 12mm in diameter.
This plate is made from 75mm x 75mm x 16mm with a smaller diameter hole in the centre to lighten it up slightly and to be able to add a bit more internal weld when mounting it to the chassis.

The bottom of the stalk and the base plate are fully chamfered 45degrees (both top and bottom of the plate so as to get complete weld penetration), pre heated to 100 degrees Celsius, tacked into place to suit the mast rake needed (less the 3 degrees of the mounting plate) and then it's all fully welded up. The 4 triangles around the base are simply built up with the welder at this time and ground to shape the next day after cooling down. The final shaping may need to be done, so it all clears the bolt heads seating area.

Sorry bout the blurred pic, it was dark in the back of my shed.
The mounting bases are supported along each of their sides with 25mm x 6mm Flat bar and the front 2 corners filled in with 3mm thick small triangles to make the front a solid structure. It's open to the rear to be able to wash it out with water after sailing.
The 2 base positions in this pic are for different size sails to keep the Centre of Effort correct (more rearward for smaller sails.)
The mini is facing to the left of photo. This stalk is setup at 2 degrees "negative rake" (forward) for a 8.3m2 and 6.6m2 sail.
This may seem very strange to have a "negative rake" forward in the mast, but it must be remembered that the overall curve in the mast is over 1000mm so the Centre of Effort remains in a very conventional plane.

With different rake angles on different stalks, or by simply mounting them turned around 180 degrees we get the mast rake we require to get the original base/foot of the sail to sit just above our shoulder when fully sheeted in. ![]()
These are some of Greg's and my mast tip extensions. A full carbon build up by Greg on the left complete with a proper tip thrust bearing. The black electrical tape for the spacer is still on it.
A more conventional "pin top sail" alloy windsurfer extension that you add spacers to the mast tip in the centre and my blue fibreglass and timber with a nylon pivoting tip. The dowel spacer it just taped onto the side so it's not lost when not used inside the blue fibreglass (old mast tip)
The nice thing with these is, as the sail stretches to it's working set after being rolled up for months/years in the "Rubbish tip shop" or someone's garage), longer spacers can be added so it still clears our shoulder.

Select to expand quoteChook2 said..
I think your idea of the stays is a great one mate.
That sounds like the system used on the "Ice Flyer" iceboat.
I found an image of a landsailer version in another thread:
www.seabreeze.com.au/forums/Land-Yacht-Sailing/Construction/Wooden-landyacht/
Here's a photo showing the stay setup better:

Cheers,
Geoff S.


Dam Chook if staying my mast doesn't work then commissioning one of those stalks is going to cost more than a good drop of rum.
And yes I saw that ice flyer design some time ago, it was vague memories of that that set me of on this tangent.
Ah well the new mast and sail should be here this week so ill have a play over the weekend and report back shortly.
Yes that was my old wind flyer, except for the Bleriot it was my favorite yacht, very fast and could turn on a dime. and a pleasure to sail. (was destroyed when water got into it during winter in Bridgetown) Dam still had black hair then


This is why it was so much fun, biggest problem, none to race with and lousy at tacking,if I had had more experience at the time I would have changed the sheeting system
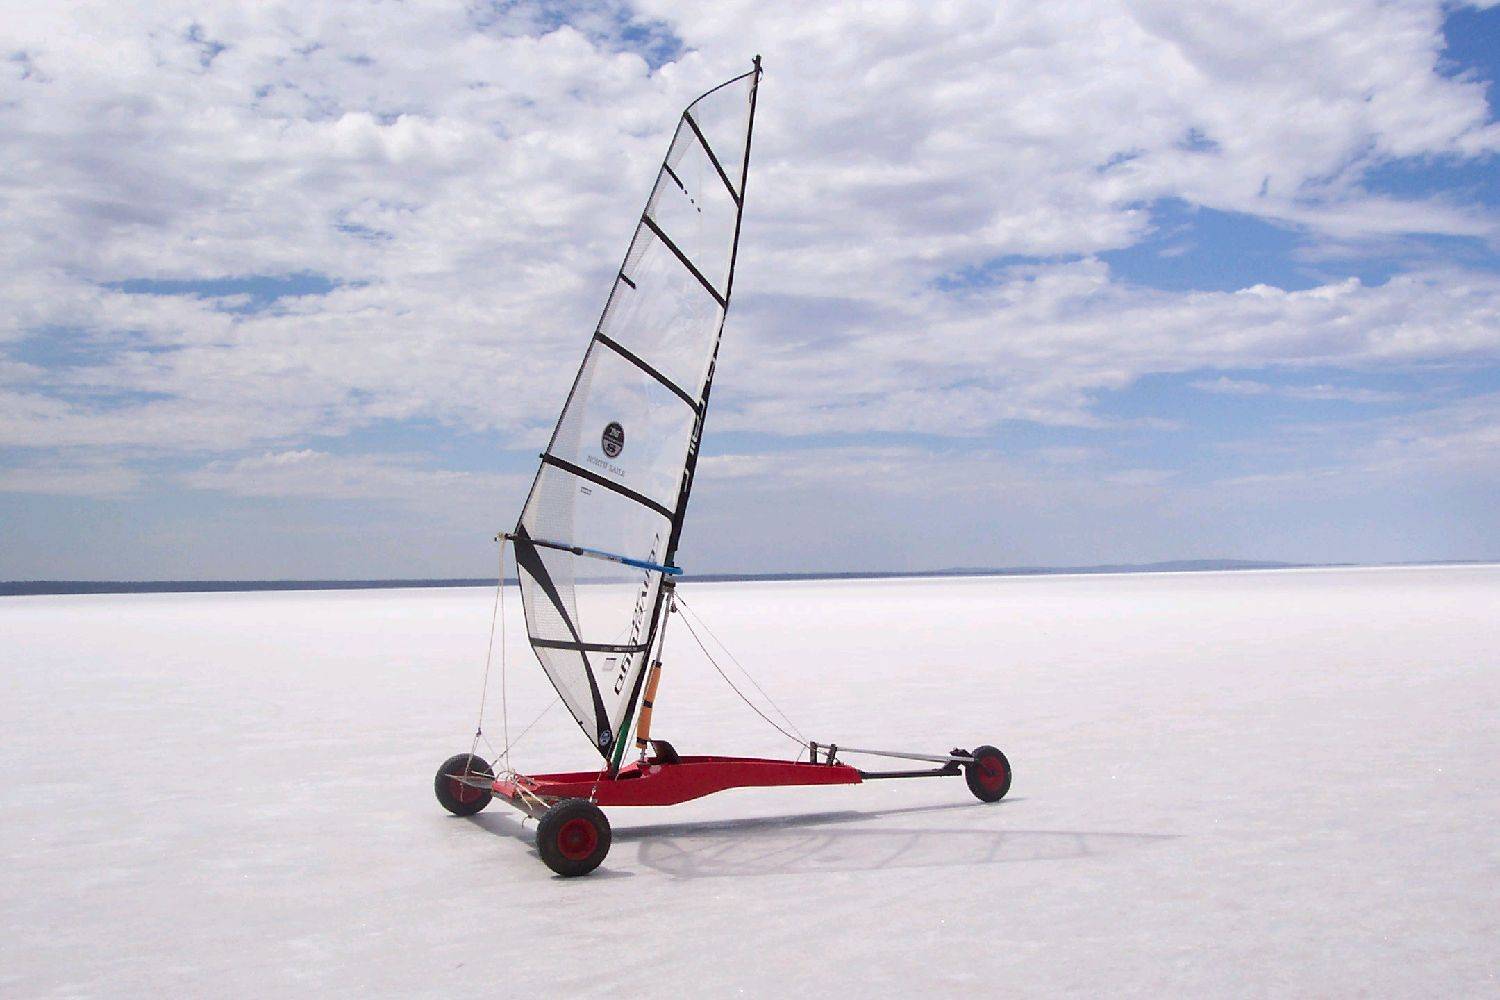
Ok here goes.
The plan is to modify my class 5 to use modern windsurfer sails.
After looking at what other people have done I have decided to try something similar to the Ice flyer above.
My thinking goes something like this.
- I want to be able to quickly switch back to a standard class 5 if I want to race.
- I don't have easy access to a lathe and my welding skills are still improving.
- looking at a modern cam batten sail it seems logical that to get the best performance from the sail it should be used as close as possible to "as designed". This means avoid stiffening the mast and avoid modifying the sail.
- Design the system to support the mast at the point where a standard wishbone boom attaches.
- Use a wishbone boom to allow the belly of the sail to set as designed.
Original frame before any mods

Added a bracket to receive a standard windsurfer pin base and shortened the steering rail, not the receiver has 3 positions for the pin base in 50mm steps. Advice for Greg was that I will want to move the mast base back to somewhere very close to my feet. This places the new base between 200 and 350 back from the original position.
NOTE: I tried making a bracket that sits in the top of the existing mast step but this left the new boom and the mast stay attachment point way too high. All the angles just looked wrong so this is plan B.

Next we need modify the mast a bit to allow for attachment of stays.
I made a collar from 10x3 mm aluminium bar and glassed it to the mast immediately above where the standard wishbone boom will attach.

Repeat the same process with an of-cut from an old mast. As you can see the stays are attached to the of-cut.
Stays are 5mm Spectra


The off-cut sits above the collar on the mast, I hope this system will allow the mast to swivel a bit easier and also make it easier to swap masts when changing sails.

More tomorrow after the paint dries on the frame.
John I think you will struggle to get your spectra to hold with just a whipped joint. Being hollow cored it shrinks (in diameter) a lot when tension is applied. 5mm should hold about 1000kg.
It's hard to see if you have spliced it. ![]()
Check this out, as this is what I have been doing for years with my kites and is very easy to do.
I use an old broken car aerial as it has heaps of different sizes to make my own fids. The barb at the end of it is the important bit to stop the spectra pulling out when working with it.
I've never had a splice fail doing it like this. Quick and easy. ![]()
Pinch the end and a drop of super glue or use a cigarette lighter to melt it stops it fraying while you work it with larger spectra. Then cut this bit off as you taper the tail out so you end up with a gentle transition back to the original diameter.
If the first end is too big, or fixed to something, you can use this method for the second end.
if you are going to whip the ends use a needle and also sew the whipping this will make it tighten as strain come on. but yes chooks system is similar to making ski ropes.they getstronger as pressure goes on
if you are going to whip the ends use a needle and also sew the whipping this will make it tighten as strain come on. but yes chooks system is similar to making ski ropes.they getstronger as pressure goes on
Woke up this morning to a nice NW breeze, meaning our corner of the lake should be dry so time to test all this mucking around.
Put everything together for a final rigging test.


First run was interesting to say the least as the stays loaded up and everything started listing over.
After a quick stop to re-tension the stays it started feeling pretty good, really started moving as the apparent wind built up.

A couple of tacks later and about 2km from the car something went bang.
After getting out from under the tangle of stays and sheet ropes I found that the mast pin base had shattered at the flexible coupling.
As you can see there is a fair bit of corrosion in there so I'm hoping a newer one might handle the load better.
Also starting to think wire rope stays would be a good idea. The spectra should be ok in theory but seeing a 5mm line under that much load is just creepy.

Well to save anyone else wasting their time. Spectra stays while theoretically strong enough just don't work, I had eye thimbles whipped to one end and figure 9 knots in the other end and there was just too much give.
I made a solid stay like a manta but taller which I haven't tried yet but its just ugly even if it does work I don't think I want to be seen sailing it. Will post pix when I get around to testing them.
In the mean time while waiting for the lake to dry off again I have had another look at what Chook posted above.
While Chooks solution is very good, I cant weld that well and don't have access to a lathe.
I also want something adjustable since if all this works i will probably end up buying several more sails.
Sailing last weekend with Ben we scratched this out in the sand...

By dropping the stalk through the top of a piece of SHS we can take heaps of reliance off the top weld. The other critical welds are more spread out with larger weld area. Probably cost an extra 5kg in weight but it is adjustable and all importantly build-able.
As you can see the stalk and pivoting assembly can be moved fore and aft along the reinforced spine.
The bracket on the spine is another piece of 50x50x5 SHS with one side cut out to make a channel section.
We were lucky enough to get hold of some Jumbo drill steels which just happen to be hi quality chrome molly steel @ 39mm diameter which is a perfect fit in the alloy scaffold tube used as a stiffener and mast extension.

I think the adjustable spine looks a bit long, will probably shorten it by one 75mm notch.
Spine reinforcing, base and stalk assembled ready for welding.

This shows the mast on alloy strengthener on steel stalk.


Good thing Paul had a spare Y frame rusting away in his back yard or this would have taken much longer.
Well some of the steel is so heavy it feels more like I'm building a battleship than a land yacht but I think it might hold.
NB: the leveling bolts in these pix are 12mm will replace with 16mm set screws when I get to the hardware store.
The spine channel overhangs somewhat to allow the pivoting stalk to be positioned forward enough to take a standard class 5 rig.
The pivoting stalk was designed to rake back to about 18 degrees max and is adjustable in 75mm steps from the position of a standard class 5 to 375mm aft. This might be too much but i didnt want to be one step short of the right position.
The extra 12mm holes on the spine are to locate the semi adjustable steering bracket.

Side cheeks are 10x50 flat bar

Ready to paint

Had a Eureka moment yesterday when I realized that the foot of my old mast extension was the same diameter as the alloy strengthener we are using.
EVERY other mast extension I have looked at is 2mm smaller. You can see on the old extension the shim on the right hand end.
If anyone else is thinking of trying this I highly recommend you take this shortcut.
These extensions are still in production see
radz-hawaii.com/

Good progress on the new pod.
Basic shape is same as the old one but there will be some tweeks. I will ilustrate the difference when its finished.

Glad wrap helps hold the glass mat in place where it wants to peel up

Very interesting. I wonder if in 20 years we'll be sailing cammed windsurfer style sail powered yachts, and looking back thinking how ancient the old land yacht sails look. Looking forward to seeing how your yachts turns out ![]()
Nah none of that "Mum's flapping laundry" traditional sails......... they are just so restrictive. (And expensive for what they have in them, compared to windsurfing rigs).
We are certainly headed in the right direction with windsurfing full aerofoil sails.
Just that most of the yachting community is still sound asleep. ![]()
![]()

Sporting Ben's new 3m sail re cut for a traditional class 5/mini rig.

And tested today with the sail I built it around (7.1m Ka full race 4 cam on a 4.6m carbon mast)
Had a very good test sail, 23kmh wind and easy to 60kmh before ruining out of room on the clay pan.
Cant wait to get her out on the lake with room to wind her up.


Moved the mast forward and raked back as far as it will go.
Scored a new PB of 85.3 first run out.


Nice work both of you!!!! ![]()
![]()
Glad you gave the new steed a gentle shake down too mate. ![]()
That 7.1m2 will really crank too John. It will just be a bit trickier to get into wind for a start, till you get used to it. ![]()