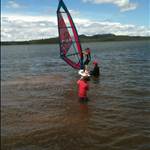
Thought I'd throw this out into the seabreeze community. Had the good fortune recently to be the recipient of a 2012?? Isonic 90 Wood that had sat in a van during one of our stinky hot summer days here in FNQ. Ordinarily, that isnt an issue, except that the bung hadnt be loosened. End result - a perfect looking board topside, however underneath.......was another issue.


Virtually the entire base had delaminated. So, I am now sharing my journey in repairing this board. Not having had a crack at anything like this in my entire life and being somewhat impatient (could cause the odd problem), i gleaned information from fellow GPS team members and Seabreeze post's past to try a put together the most suitable way of getting the board seaworthy once again.
Primary in the back of my mind was going to be weight. As I stated earlier, I havnt done this at all and wasnt sure of really what to expect, except that I was really keen for the girl not to put on to much weight. I said a target of 1000 grams - no more. Weighing here in prior placed her at 6.8kgs on a set of our handy bathroom liars. I think this bodes reasonably well, however, if not, the end weigh in is by far the telling result.
As you can see, we decided to use the criss cross method (as seen previosly in past forums in an attempt to keep the majority of the hull wrapped in its own skin, without having to introduce to much excessive weigh bought on by resin and glass fibre mat. The EPS core itself was still hard as a rock, with only small amounts lifted of with the skin. This left me with a very good base in which to work with. First up, quickly whipped of the grey undercoat. Next job was to inject the resin in underneath the skin and get it as close and beyond the rails as possible to give it the best strength. I decided to drill a series of holes - the same size as the 50mm syringe I was using.


Resin of choice was FGI R180 plus Slow Hardener and QCell filler. Started mixing small batches to start with - no more than 100mm, mixed with QCell untill the resin was pretty much a slowishly running paste(if that made sense?). PS - added slow hardener after I had mixed in the QCell - to the overall volume of Resin/QCell mix. Found, by accident really, that this worked quite well. Allowed me approx 25 mins all up before the hardening really started to take effect. 25 mins may not seem like a long time, but I was very surprised. It is more than enough even for a job like this.Esentailly I injected all the out side hole's first, allowing the mixture enough time (helped along by adjitaing the hull) to really (and hopefully) get into the rail sections. Once they were complete, it was time for the rest of the panels.
Just a quick word of warning to anyone else who may consider giving this a crack (and I would highly recommend it), you dont need to much resin mixed up. I bought a kilo and 200 gms of Slow hardener (Ratio 5:1)thinking Im going to be back. Not the case. Ultimately, I did mix up 800gms of resin all up, but ended up throwing out 200-250 gms I reckon. The over flow out from underneath each of the criss cross panels was more than enough to fill the cuts roughly.

Kids "Wahoo Mats" came in handy. Just prior to adding the weights below to set the skin back in place. Feeling pretty happy.

Covered the entire board in Polyethelyne sheet, same stuff you use when concreting (doesnt stick to the resin and it didn't) and apply just enough weight to slightly squeese out the resin into the joints. Allow to set, dry for 24 hrs. Mmm, beer o'clock.
Next day, into the task of sanding back to excess resin than has dried on the veneer, continue to fill the ciss cross cuts with fresh resin and QCell ( I made this batch into the consistency this time that was quite thick yet easily applied) to a point where you have a lovely smooth base once again. Basicaly I was preparing for a layer of 4oz glass fibre, just to give the hull that final bit of stength back that may or may not have been taken out by the criss crossing.

Filled and sanded.

4 oz glass sheet layed and wetted - decided just to take it to the edge of the rails only. Reasonably confident (i guess time will tell) I managed to get enough resin into the rails on the initial injection phase. Once again on the phase, let it fully set for 24 hrs - just in case.

Fully sanded back and now ready for one of two coats of auto filler. My tip, manage small areas at time. I really struggled, in fact, it didnt happen at all, to get the filler in on the entire hull in on go before the damn stuff went off. Tried varying amounts of hardener but to no avail. In the end it was far simpler just to do small areas at a time and keep mixing small batchs. Now, you dont need much of this stuff. You are only filling the holes left by the resin not completely filling the matting. Very thin skim layers is all. Sand and if required apply final top coat and re sand. This will give you a finish that is smoother that a babies bum. I found that I was aware that I had sanded enough when I could ever so faintly see the base through the filler. My biggest concern was weight, and filler is quite heavy.
Good old SCA Grey Primer/Filler 400gm spray cans (great value - two cans for $9.90). I took some time with this. I think in the end I sparayed 3 times and sanded in btween after each coat was dried. This way you can really come close to achieving the original finish that is somewhat mottled (ability to see some of the veneer through the paint). Then finally SCA Clear Acrylic final coat. Just to give it a lovely smooth finish. All up, buying materials retail - $265.00. Time spent overall - 6 days. Apparently I have to do actual paid work stuff. Satisfaction Rating - OUT OF THIS WORLD ![]() . I would recommend to anyone - just have a crack.
. I would recommend to anyone - just have a crack.


And the best part - I started off with a board weighing in at 6.9kg's prior to the commencement of surgery - she now weighs in at 7.8kg's. An increase of 900gms. Pretty stoked. I guess time and TOW will be the ultimate test of how good this repair is, but overall I believe we have managed to come up with a pretty good compromise between strength and added weight.
Billy, you can do my repairs now! Perfect job mate. I totally agree regarding the satisfaction level of repairing and refurbing an old or damaged board too.
Looking forward to reading about your first session on it although you may have to bring it south if you want to use it before winter.
PS Kel might want it back now ![]()
Gee a single layer of 4oz glass seems a bit light on for decent tensile resistance.
Could you let us know how it survives in the long run?
Select to expand quoteNotWal said..
Gee a single layer of 4oz glass seems a bit light on for decent tensile resistance.
Could you let us know how it survives in the long run?
NotWal - your right, only time will tell how long the repair does survive. That was one of the overwhelming considerations I took when deciding to leave the hull virtually intact. Keep as much of the skin in its original place and condition. One of the pieces of information that kept coming to the table was keeping the weight as low as possible. To much weight = less performance. It was a real juggling act.
Cant wait to throw it back in the hands of its original owner to get his opinion.
Looks good, but if there's going to be a weak spot I bet it'll be along that perpendicular cut directly across the board.
Hope I'm wrong, ![]()
Great photos and excellent and clear commentary.
Looks like a really great job....very professional!! Congrats.
Select to expand quotegoofy said..
Looks good, but if there's going to be a weak spot I bet it'll be along that perpendicular cut directly across the board.
Hope I'm wrong, ![]()
agreed
best to cut a big diamond to remove all the delaminated area in one piece, then bag it back down with some resin.
But for a flatwater board, and given the addition of some material, I reckon it will be just fine
Select to expand quoteJas71 said..
Well done, looks awesome. you will have plenty time sailing on her.![]()
looks horrible, why the star cut out? i would have just glassed over the top of the whole thing. also what are the holes for?
Well done Billy, great first go ![]()
Here's one I did 14 years ago nearly the same, sold it to a very young Troppo who sold it on, the guy emailed me last year and said it's now a bit sad but still going so don't worry yours will be fine ![]()

Select to expand quoteflyingcab said..Jas71 said..
Well done, looks awesome. you will have plenty time sailing on her.![]()
looks horrible, why the star cut out? i would have just glassed over the top of the whole thing. also what are the holes for?
are u actually seriously asking?
it was a delamination ......... the whole sandwich layer needed to be stuck down to the core, so a glass over would not do.
Has any one ever tried using a syringe to inject resin through the bung hole ( right through the foam to the base ) the applying vacuum to suck the bottom back up while it goes off ?
I was wondering why the need for the cuts. Wouldn't just drilling a grid of holes so the same job?
Great job by the way, and the 2012 iSonic 90 is definitely a board that deserves saving ![]()
G'day ShearTip, and thank you all for the kind comments. We tend to push these things out in cyber space expecting a mixed response, which is exactly what I got. Its good. Every one is entitled to their opinion.
ShearTip, back to your comment mate. The reason for the cuts were firstly:
1. By not following the process of completely removing the entire skin and re-attaching it, I had to have a method of checking out the condition of the EPS core underneath. Yes, I guess we could have just drilled the holes and injected the resin, but as mentioned before, had no real understanding of the condition of the core.
2. By criss crossong the skin, I have the ability to lay every part of the skin back where it came from and the ability I guess to keep 95% of the structure in tact. Going about it this way also doesnt require the use of a vacumn pump, which I didnt have access to. Also in the back of my mind was - what if I dont have enough time. Well then I can just work on the panels 2 at a time if required.
Cant wait to get my hands on another in the near future to continue the journey.
Mastbender and Simon100 - OMG no please no.
Workwork glue - ![]() no way.
no way.
Resin thru bung hole will not give coverage, you will get a spot of adhesion in the middle of the delam and nowhere else.
Best way is to cut off the whole area and then bag it back down making sure to preserve same rocker. Parentalrite's method would be the easiest for most people