OK, so after repairing my isonic and stocked with the repair and performance of it, I discovered the vent plug leaks ![]()
I have been vacuuming the water out + using a wick & wind to get what I can from it.
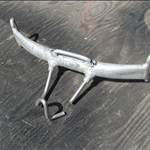
Here is a photo, it seems there is no smooth surface for the o-ring to seal to. Any ideas on how to fix this? OR do I just add a new vent to the board like this one: chinooksailing.com/collections/board-building-part-accessories/products/1-board-vent-w-slot (I can get these in NZ. )

Easy peasy
Throw away o-ring
Mould release wax on screw threads and head (Kiwi or similar shoepolish works great)
Tiny bit of JB weld or similar on the flat surface down the hole, and a bit on the underside of the vent screw head. Don't over do it..... needs stuff-all
Screw in - not quite all the way, u want a good millimeter of resin thickness between the two
Wait a day then remove.
New o-ring.
EDIT: not 5min JB Weld, its too hard to get it right that fast. Alternates are Devcon, Abro. Any auto store should have a quality metal filled epoxy like those
I've repaired a couple of JP boards with defective vent plugs. I stuffed tissue paper down level with bottom thread (to prevent glue completely plugging hole), then plugged it with epoxy to the land. I then drilled and tapped out a new thread and then pulled out paper. To level the land, I used a dremel planing bit and guide. Good as new and a proper job. For the tap die, I took a standard vent screw, and grinded four grooves into it's side. I'll send some pictures if you are interested. PM me.
Or get a drill bit , the size of the hole , ( I think it's a 12.5 or 13mm ) and very gently ( I mean very gently ) by hand twist the drill until surface is smooth. The standard drill angle is very close to the plug hole angle. New O ring. I do this to every board I come across if it needs it or not .![]()
PS , is this a normal vent plug and is the thread ok ? If so , as above , if not , disregard ![]()
I bought a vent plug for one of the boards I made, it was molded and it had the mold seam right across the seat. I didn't realise until it sucked water. I think I used a router to cut it out and put a decent chinook version in.
Ok , here is the tech.
As a injection Moulder ( that is what I do ) and that is how a vent plug is made.
The plug which is thick plastic takes time to solidify .
Time is money.
Moulds are water cooled.
Any part with an internal thread has to have a mechanical screwing in and out part of the mould.
This part forms the hole , seat and thread.
When moulded and cooled properly I would guess a cooling time of the plastic should be about one to one and a half minutes ( based on max plastic thickness of 5 mm ) , 270 deg plastic x thickness x mould temp x time
It is a balance.
To save money , shorten cooling time in mould = less than perfect part . U can see this in just about every injection moulded part of anything.
So we get in a vent plug a hot threading seating pin that gets so hot as it unthreads leaves a soft mucky crappy seating surface.
It is a technically hard thing to overcome .
The plug in cost is 2% plastic , 3% power , 95% machine time , that's before profit.
Ill shut up now , you get the idea.
Select to expand quoteImax1 said..
Or get a drill bit , the size of the hole , ( I think it's a 12.5 or 13mm ) and very gently ( I mean very gently ) by hand twist the drill until surface is smooth. The standard drill angle is very close to the plug hole angle. New O ring. I do this to every board I come across if it needs it or not .![]()
PS , is this a normal vent plug and is the thread ok ? If so , as above , if not , disregard ![]()
no, it should be flat. not saying this would not work...... but if his is really munted then fill is better than re-cut as I suspect yours needs quite a deep cut to restore the bearing surface.
Talking about what we should do on every board - check they actually drilled it out after installing vent plug!!!!
I never try to repair vent holes anymore, you're never quite sure if you got it right, and a new retro fit vent is just so much easier with the solid feeling that it's good to go after installing it. # R62-5119


From www.fiberglasssupply.com/Product_Catalog/SurfSailcom/surfsailcom.html in the states, but there is probably a supplier where you are.
Select to expand quoteMark _australia said..Imax1 said..
Or get a drill bit , the size of the hole , ( I think it's a 12.5 or 13mm ) and very gently ( I mean very gently ) by hand twist the drill until surface is smooth. The standard drill angle is very close to the plug hole angle. New O ring. I do this to every board I come across if it needs it or not .![]()
PS , is this a normal vent plug and is the thread ok ? If so , as above , if not , disregard ![]()
no, it should be flat. not saying this would not work...... but if his is really munted then fill is better than re-cut as I suspect yours needs quite a deep cut to restore the bearing surface.
Talking about what we should do on every board - check they actually drilled it out after installing vent plug!!!!
I always thought the seating area was angled , that would make for better seating . It would stop the o ring getting pushed out sideways and failing.
One other thing to check on a new board is that the threaded hole is actually 90 deg to the seating area, I had a brand new board once that the vent plug was so far out of square the oring would not seal and it sucked in a fair amount of water. In fact I was quite suprised how much water was pooling out over the board once it warmed back up in the car after a winter session.
What I have noticed on new boards lately is that the thread is quite tight which would probably stop it from venting around the thread as good, so I have been running a 3/8 bsw tap down the hole just to make sure it will vent when undone. Would not have been an issue when the plugs had the flat on the side to aid venting.
I like to hear that little hiss when opening the vent when I get the board home ![]()
Thanks to all your input on this.
I first tried Mark's advice with JB weld and shoe polish. I got this close to working, but I think I was somehow cross threading the newly formed JB weld section (when screwing the plug in) OR was I doing it up too tight? and it was coming off in bits when I unscrewed the plug. I tried minimal amounts JB weld and lots of JB weld and also leaving it for a few days and I had the same result every time.
For $9 + shipping I ordered a Chinook board vent and installed that. This works well for me :-)
Check that the plug doesn't have a micro crack running away from it. From memory towards the back right side. I think this board could quite possibly be my old board that was warrantied. From your first rebuild post it certainly looks like you were repairing all the spots I found to be soft before it was sent back and is the same model and year by the looks of the graphics.
Anyway I had it sitting in the sun with the plug shut one day and noticed water bubbling out from what looked like a small crack radiating away from the vent plug hole.
Thanks for the heads up.
I did notice some delam between the vent plug and mast track when I was drying the board, thought it was caused by all the water coming out, but it may have been there before hand? Anyway, this area was sanded back and repaired when the new vent plug went in.
She is water tight at the moment and I check it after every session to make sure.
Select to expand quoteMastbender said..
I never try to repair vent holes anymore, you're never quite sure if you got it right, and a new retro fit vent is just so much easier with the solid feeling that it's good to go after installing it. # R62-5119
From www.fiberglasssupply.com/Product_Catalog/SurfSailcom/surfsailcom.html in the states, but there is probably a supplier where you are.
I just purchased a couple of these retrofit plugs for my Carbon Art boards. What's the best way to secure these plugs? Could I just use a 2 part epoxy glue?
I have 2 starboard wind sups which from new leaked at the vents. Seat was chewed up on both of them. Tried the drill suggestion in this thread, as it seems to be the quickest fix. It made a complete mess of the vent. Even just using hands to turn it bites in and you cant get an even surface. The material is too soft.
Ended up drilling them out with a 35mm hole saw, and installing goretex vents from shapers manufactoring co.
Set them in with Epifill 2 part epoxy.
No maintenance required now
Select to expand quoteMcSailing said..
and installing goretex vents from shapers manufactoring co. Set them in with Epifill 2 part epoxy. No maintenance required now
Oh dear, there's water in the board right? From when the original plugs leaked.
Trouble is Goretex doesn't breath when there's water both sides of the membrane!!!!!!!!!!!!!
Rip them out and replace with standard plugs or you're asking for delamed boards first time they get hot.
Select to expand quoteStretchy said..
I just purchased a couple of these retrofit plugs for my Carbon Art boards. What's the best way to secure these plugs? Could I just use a 2 part epoxy glue?
Yes Rob, I normally put them in with a qcell bog. but any epoxy will do the job, just make sure there are no voids and the breather hole is clear after wards. I usually cover the holes ,in the top and bottom of the plug, with small pieces of tape.
Make a damm around the hole in the board with more tape. Pour the resin into the space, and work it over the sides to seal the foam. Plonk the bung in the hole. If you're going to wipe away the excess wait until it's had time to settle and shrink.
Select to expand quoteBecause I had some delam beside the old vent my hole ended up larger than normal hole when the vent came out. I shoved a large diameter screwdriver down the vent hole into the EPS, then filled the area with 2-part urethane foam. Then drilled a new hole for the vent plug in the urethane foam. When using epoxy + qcell I was worried about it flowing down into the EPS. So I filled the new vent plug with the kids play doh and pushed the screwdriver (with shoe polish on it) through it and down in into the EPS. The play doh kept the epoxy out of the vent plug.
My final stage was to remove the screwdriver and fill the new vent plug with play doh and glass over it (I was glassing the delam area anyway), I used a craft knife to cut a hole in the glass when it was still green. Once set I sanded the hole and it was good to go.
This was my first attempt at replacing a vent plug, there my be better ways!
Having come from NZ made boards that either didn't have a vent or CA boards with gortex vent, this was my first dealing with a vent plug full stop. Unfortunately for me it took two leaky sessions to work out the vent was faulty and it wasn't down to me using the wrong O ring or amount of screw pressure.
Its all good now though with the brand new vent :-)
Select to expand quotedecrepit said..McSailing said..
and installing goretex vents from shapers manufactoring co. Set them in with Epifill 2 part epoxy. No maintenance required now
Oh dear, there's water in the board right? From when the original plugs leaked.
Trouble is Goretex doesn't breath when there's water both sides of the membrane!!!!!!!!!!!!!
Rip them out and replace with standard plugs or you're asking for delamed boards first time they get hot.
I'm pretty sure there's no water inside. I had wicks in the original vent hole for 2 weeks until it stopped pulling water. & stayed dry. I then left the boards for 2 weeks in a warm spot with a 35mm hole in the deck. The new vents can also be unscrewed to remove the Gortex screw and act like a standard plug anytime you need to.
Thanks for the warning, i will unscrew them for a month or so to be sure.
Select to expand quoteMcSailing said..
>>> The new vents can also be unscrewed to remove the Gortex screw and act like a standard plug anytime you need to.
Thanks for the warning, i will unscrew them for a month or so to be sure.
Be very careful, gortex vents aren't designed to be screwed in and out, the top cover attachment is very fragile, any excess force on it and it snaps like a carrot. The vent will probably still work, but it leaves the gortex exposed to sand, grit and possible penetration.
You have to try and get the turning pressure as low as possible and it's not easy.
Select to expand quotedecrepit said..McSailing said..
>>> The new vents can also be unscrewed to remove the Gortex screw and act like a standard plug anytime you need to.
Thanks for the warning, i will unscrew them for a month or so to be sure.
Be very careful, gortex vents aren't designed to be screwed in and out, the top cover attachment is very fragile, any excess force on it and it snaps like a carrot. The vent will probably still work, but it leaves the gortex exposed to sand, grit and possible penetration.
You have to try and get the turning pressure as low as possible and it's not easy.

This design is easy peasy to remove. Removes with a socket. Screw can be replaced if required, sold as a separate part. Has an O Ring just like a standard Vent screw. Gortex part is held inside the head of the screw.
I'm no expert, but it seemed like the best of both systems in one design.
^^^ except that goretex will always stop venting eventually. You won't know when.
Or if the membrane breaks it will let water in, and you won't know when cos u can't see it.
Or if water gets in elsewhere it will stop venting as the water is now on both sides. Then u repair the board so now it is sealed and not venting so it pops.
They are great for the lazy, or new-to-SUPing type people who don't get it and will only keep that thing they use twice a year for maybe a couple of seasons anyway.
The best advice from surf shapers forums like Swaylocks seems to be that salt crystallization blocks them up and they need to be washed every time with fresh water and replaced every year for safety. Makes sense to me..... but that is not the 'set and forget thing' they are sold as now is it?
One guy with a certain brand of boards with goretex filled a couple of the vent holes up as he knew they were stuffed. I repaired 4 major issues on his boards this season, just from letting them dry in the sun on mild days. Both the vented boards and the ones with filled up holes.
Personally I prefer not to risk it.
Select to expand quoteMcSailing said.. This design is easy peasy to remove. Removes with a socket. Screw can be replaced if required, sold as a separate part. Has an O Ring just like a standard Vent screw. Gortex part is held inside the head of the screw.
I'm no expert, but it seemed like the best of both systems in one design.
Yep, that's the one, that cap on top breaks off as easy as, especially if the socket is a bit wide/worn at the end, then instead of it working on the base of the plug, it works on the cap. In my opinion, if it was designed for frequent removal the cap should have been smaller and round, so the only hex part was at the base.
Select to expand quotedecrepit said..McSailing said.. This design is easy peasy to remove. Removes with a socket. Screw can be replaced if required, sold as a separate part. Has an O Ring just like a standard Vent screw. Gortex part is held inside the head of the screw.
I'm no expert, but it seemed like the best of both systems in one design.
Yep, that's the one, that cap on top breaks off as easy as, especially if the socket is a bit wide/worn at the end, then instead of it working on the base of the plug, it works on the cap. In my opinion, if it was designed for frequent removal the cap should have been smaller and round, so the only hex part was at the base.
Thanks for the warnings. Better buy some spare screws & replace at least every year.
My Severne Fox comes with a Gortex vent. Now I'm worried about it. I do rinse boards after every use.
I guess I could always fill the screw part with epoxy to make it stronger, and just undo whilst not in the water like a regular vent. I'm thinking a bit of silicon grease on the O ring might take some force out of the process of tightening & less change of breakage.
What's all the problem ?
On all my boards ever , I only had normal plugs. I made sure the seat and o, ring was good , done them up tight and never touched them again . Never a leak , delam or any problem.
Ps : never took them on a plane or left roasting in the sun on roof racks without a cover.
I personally think that opening the vent regularly will only suck sand onto the o ring and break the seal.
Again personally leave the thing alone unless under extreme heat or pressure , or drying the board out in the sun for repairs.
close it up, few soapy suds around it and stick it in the sun - presuming no leaks anywhere else.....
Or, cotton bud down the hole..... but many boards will be ever so slightly damp down there anyway so that's not an easy way to tell (unless u had the board since new and never ever opened it.
Imax is crazy ![]() Just at my local I saw 4 or 5 boards pop this summer when just left out to dry after a session. And thats not hot weather, high 20's with breeze. Dark graphics......
Just at my local I saw 4 or 5 boards pop this summer when just left out to dry after a session. And thats not hot weather, high 20's with breeze. Dark graphics...... ![]()
Select to expand quoteMark _australia said..
>>>>. Dark graphics...... ![]()
Crazy stuff, I wouldn't buy a board with any dark areas, It's a recipe for disaster.