Thanks Bigdaz so am I.
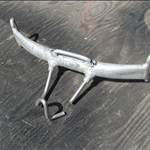
Been a bit busy with bulk rubbish verge collection, chopping tree's (with my trusty axe) etc so no work on my board.
I normally put the mast track box in when I glass the board, I thought I'd try something different this time. I've applied a bog filler of qcell and resin to the deck and sanded it back after it hardened, also marked on the rail's in black where the mast will hit the board and I'll add extra reinforcement patches in this area.

I love boards with a square tail and a square nose.... They are so feckin cool ![]()
![]()
![]() And if it's a BJ board it will last for ever and ever .... Amen
And if it's a BJ board it will last for ever and ever .... Amen ![]()
Very boring update, been a bit busy with family and work and life haven't touched the board in nearly a month now ![]()
Well it's been a long time since I last worked on my board. Work, family, chores, winter weather etc been getting in the way, plenty people when I've gone for a sail have been asking me how its going.
I finally put the fin boxes in a couple of days ago. I've been stalling on ordering the carbon in the hope of our AUD getting better against the USD, that aint going to happen in the next few weeks.

Well yes I know it's been a long time, infact so long this thread got closed but Seabreeze kindly re opened it for me. I haven't done anything to my boards, I'll bore you with some other things I've been busy with.
Made this little board rack for the back of my car.

Put together the trampoline and the swing set.

Put a little vege garden in the front garden

I've been doing heaps and heaps of this ... Very time consuming!

But after a long wait I finally got some carbon so after new year I'll be able to finish the board. I ordered and paid for the carbon and some Kevlar but was then told they were out of Kevlar and there was a six week wait until they wove some more plus postage that took two weeks.
 carbon
So nude bathing on the inside at Mett's and assembling garden stuff huh?
Love the levitating board rack too !!!!
I have some surplus kevlar, might swap it for some glass and resin or something if that saves u a big wait??
Thanks Mark I've done the big wait and now have the carbon and Kevlar.
I'm not in the water I'm hiding in the dunes watching and err putting together a couple of garden things.
I used Alien technology that I got last time I was abducted for the levitating racks.
come on mister juice we are waiting . waiting waiting ... dont leave us hanging board please ![]()
Select to expand quoteKAOS69 said...
come on mister juice we are waiting . waiting waiting ... dont leave us hanging board please ![]()
Well well well hello Mikey mike. You dissapear for a while, pop up again the disappear again for another few years, the reappear! Have you been doing some time in the big house?![]()
Select to expand quoteNR said...
single fins will be the go again by the time you finish this ![]()
Thanks Nathan I'm sure I'll have it ready by 2020
![]()
OK bit of hot day today 40 degrees it was 35 when I started mixing the resin which goes off quicker the hotter it gets. So I had to work faster today.
I wet out all the carbon on some plastic wifh 550 ml of resin. Then transfered the wet carbon to the board here it is with a few more patches of carbon to be added on. 
Now in the vacuum bag.

Another stinking hot day, at least the board doesn't have to stay in the vacuum bag so long.
I wet out carbon and carbon reinforcement rail patches on some plastic and transfered to the board and then squeeged down and then trimmed. I didn't take too many pics as I was a bit under the pump with the warmer weather and taking pics means taking of my gloves chucking them away drying my sweaty hands so I can get a new pair of gloves on.
 ?
?

You missed a bit on the deck.
(BTW just wear 2 or 3 layers of gloves and peel off as you go. I buy a box of large and a box of XL to make it a bit easier)
Select to expand quoteMark _australia said...
You missed a bit on the deck.
(BTW just wear 2 or 3 layers of gloves and peel off as you go. I buy a box of large and a box of XL to make it a bit easier)
I usually use two layers cause often a glove rips or gets a hole in it.
I've had a couple of people ask me why is the board green when its in the bag. Its breather material, I've taken a pick of the raw materials in layers like they would be in the bag
First is the corecell this is covered by resin soaked carbon fiber cloth, next layer is some black plastic stopping the wet carbon sticking to the next layer which is a breather layer of fabric it allows an even vacuum pressure over the whole board the last layer is the clear plastic a vacuum bag that helps suck and push everything down onto the board until it all dries. I could use another material between the carbon and black plastic to soak up excess resin and make the board lighter, but in the past it has made the boards not as strong and I get more pin holes when filling and painting the board.
 ?
?
I mixed up a couple of hundred mls of resin some qcell( a lightweight thickener) and some grey pigment into a thick goey paste and squeegeed this onto the deck of the board. It covers the weave and any high or low spots and I will sand it down To a smooth perfect surface. This is the deck filler coat.

This is a pic of the bottom with the filler coat still wet after just been squeegeed on this morning.
That's it for a few days or weeks until I get time to sand it all smooth.
 ?
?

Great Effort. Is coming along really well.
I traveled back in time following your photos. I made around a dozen boards in Sandwich construction between 99' to 01' (more than 15 years ago). A couple very wide/light wind boards, a few wave and high wind slalom sticks.
Geez we are all getting old. I remember we had good results using a 0.8mm thick wood veneer between 2 fibre cloths to reinforce the straps / mast track area.
It was very cheap, lightweight and incredibly strong.
I will see if I find any photos from that to post here.
Cheers
Julio
Select to expand quotenovetti said...
Great Effort. Is coming along really well.
I traveled back in time following your photos. I made around a dozen boards in Sandwich construction between 99' to 01' (more than 15 years ago). A couple very wide/light wind boards, a few wave and high wind slalom sticks.
Geez we are all getting old. I remember we had good results using a 0.8mm thick wood veneer between 2 fibre cloths to reinforce the straps / mast track area.
It was very cheap, lightweight and incredibly strong.
I will see if I find any photos from that to post here.
Cheers
Julio
Yeah post some pics.
Sanded the filler coat today. I love and hate this part its dirty, dusty, repetitive yet very rewarding fine tuning the shape of the board, making sure the vee is correct, concaves finish in the right place right depth, fine tuning the edge of the bottom tuck. Not every thing went smooth, when I mixed the filler coat the 6 year old white powdered pigment, didn't mix very well and sanding exposed little tiny specks of white. So I'm going to have to cover this up with a grey coat of paint. I was hoping just to clear coat the sanded filler.

One quick question.
How did you re-locate the foot strap holes after glassing the deck w/ carbon?
That's a really good question as I'd like to know how other people do it.
Before glassing I put some paper over the board and mark the holes and mast track, I then counter sink the holes, when the carbon gets vacuumed on it leaves little indents. I make sure all or some of the indents match up with the markings I made on the paper, the drill them out.
Applied grey primer to the top and bottom. Probably won't get any more don't this week with work and the awesome looking forcast every day for the next week! ![]()
![]()


 ?
?


 ?
?