Just so we are all clear on this , I am not building another landyacht,
not even thinking about it , there is nothing on my whiteboard
I have no new landyacht ideas...........but........
Vic wouldnt make me some wheels....... so I thought it was about time to get on and do the deed.
all this is occuring in the shed under the official guise of building new bookcases.
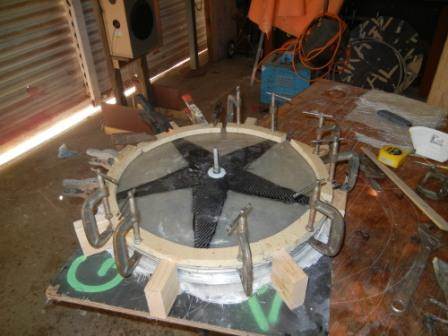
we started by following Vics lead and making the disk mold with a 26" wheel.
firstly we chose a good rim, and sealed up the underside
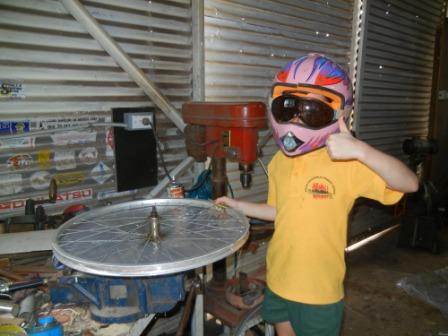
filled up the inside with something light.when dried I trimmed of the excess with a handsaw
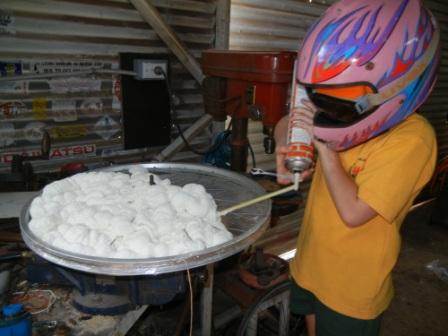
fairing was done initally with gyprock basecoat then an easier to sand finishing coat.
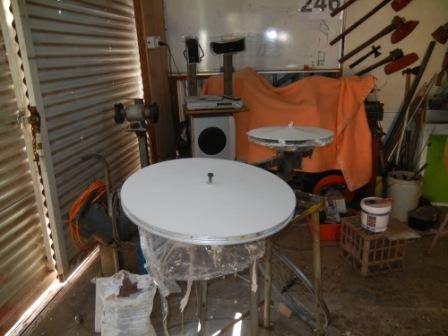
this was sanded down to 1200grit, then sealed witha sandable undercoat and resanded to 1500grit(dry). Ive done a 20" disk as well. why not!!!!!!
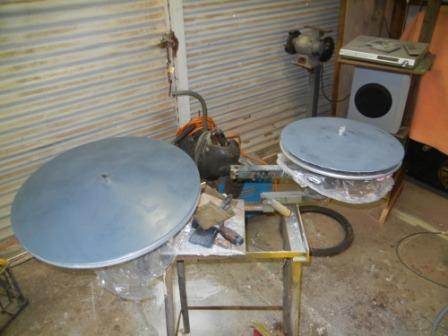
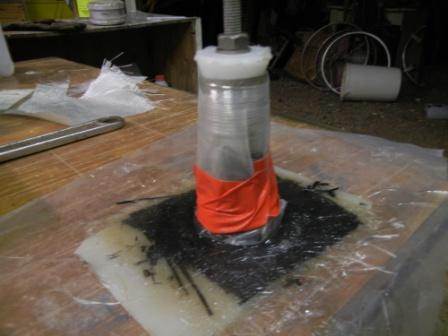
then the 4 layers of wax which were buffed off between coats, finally thePVA mold release and a mold was layed up using gelcoat and 4 layers of chopped strand
the black poly tube was layed on to stiffen the mold. easy
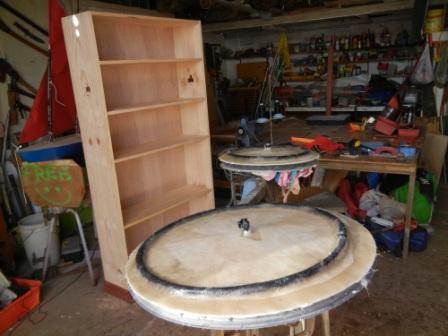
there is the first of the bookcases that I am actually building![]()
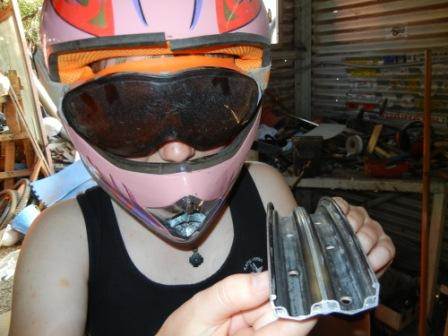
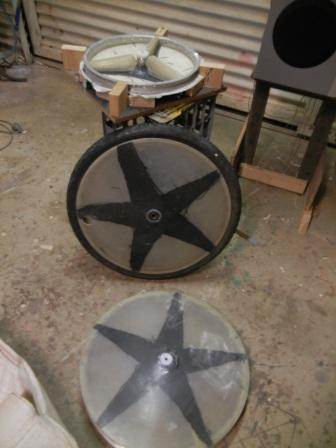
Vic has been making those lovely rims using steelrims, but I was only able to lay my hands on 1. apparently they only make alloy rims now. we were able to mig 2 rims together and get the neccessary 50mm rim with a bit of a hump in the middle of the rim( more strength?)![]()
Ive talked to a few people about the different layups that the used and why and have decide to test 9 different sample peices of a variety of materials and combinations.
they are numbered 1 to 9 and next post I will go into the details
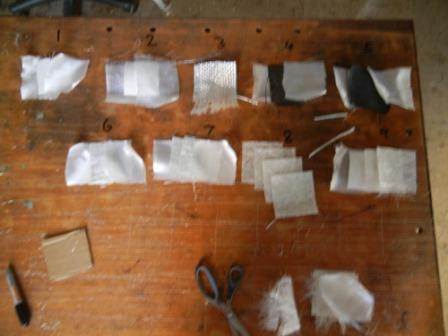
here they are layed up and curing, so some testing of flex, weight and breaking load to come
Whats it worth for me to not call promogirl and tell her to see whats hiding behind the bookcases in the shed ![]()
or has she sprung you already!
Now you are into it![]()
Did you have much trouble cutting the rims, when I tried to cut some I had a devil of a time (aluminum )
I am not game to make wheels for anyone as I would hate myself if one failed and someone was hurt because of it. Sad world we live in now.![]()

heres the range of lay ups Im testing . there are 8 with polyester resin 1 with epoxy, 2 with carbon. plus a test peice cut from a failed wingmast made by Colin Palmer(NZ). from each lay up I cut out a 100mmx50mm test strip which was then tested for stiffness with a flex-meter and the point of failure.
thanks to chook for the use of his magic little scales. How did you know![]()
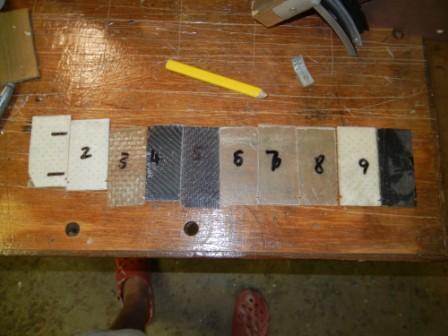
here are the finished test lay-ups +2cm deflection weight and point of failure weight
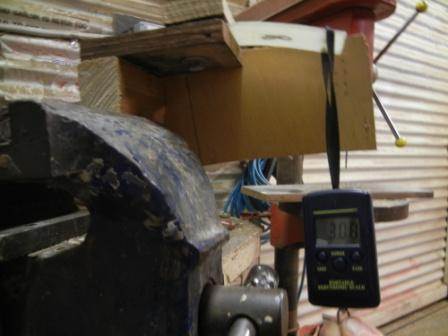
this is the deflection testing rig
1. 2x4oz woven +2mm coremat 2.17kg cracking
2. 2x4oz woven +2mm coremat 2.58kg cracking
3. 1x20oz woven 0.25kg +5.0kg 90degree delection didnt crack
4. 2x8oz woven +similar thickness carbon 0.28kg fail not tested
5. 2x8oz woven +plus similar thickness carbon epoxy resin. 0.23kg fail not tested
6. 2x4oz woven+1chopped strand 0.62kg, 1.35kg fail
7. 1x8oz,1x4oz woven,2xchopped strand 1.81kg 2.50kg fail
8. 4xchopped strand 3.95kg,9.17kg fail![]()
9. 1x4oz 1x2mmcoremat 2xchopped strand 8.67kg cracking![]()
10.CPalmer wing rib carbon/ epoxy 1.67kg 6.03kg fail![]()
the stand out in the results for me were the chopped strandx4(8) lay up and the coremat/chopped strand/4oz.(9)
I plan to let the carbon layups cure for a few weeks and retest as they feel so different to Colins piece.
the 20oz woven was like rubber![]()
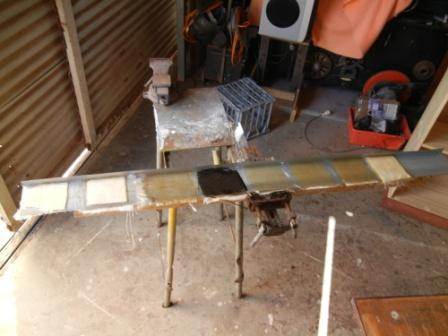
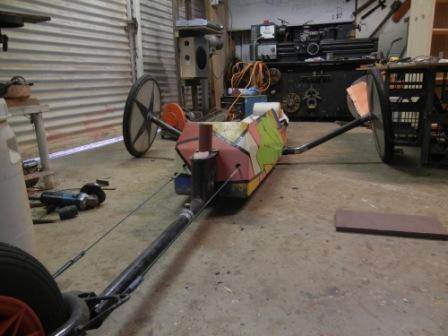
busy with the welding jig for the rims then the assembly jig for the glassing stage.
a bit of machining,looks like a race vic![]()
That is what its all about![]() I will have to get back to building my new class5 soon. Probably have it ready for its first outing at Lefroy next year.
I will have to get back to building my new class5 soon. Probably have it ready for its first outing at Lefroy next year.
Cheers
bookcases are going great. imanaged to get the right jarrah moulding for the top , and a couple more planks from perth , so thety are all go![]()
meanwhile
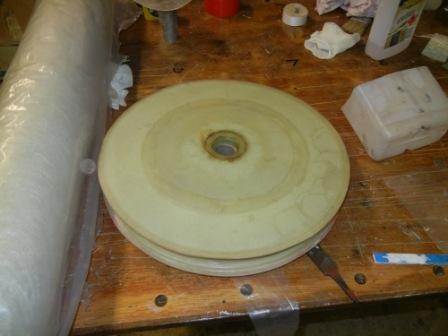
...... the wheel disks are go , the ally rims are go so ive started experimenting with the hubs rather than trying to bond in a premade ally hub as vic has so successfully done Ive decided to incorporate the bearing housing into the plastic/glass matrix. this is a photo of some 20" rims made by faze5 a few years ago . bill has made his own wheels since 1987 and has given me great advice on this project.
the process involves machining a nylon plug that is placed in the mold and has the cloth/resin built up around it to form a strong enough housing, BUT the plug must be made slightly smaller to allow for shrinkageheating etc. Ive been told to make it 0.1mm smaller than the bearing. apeice of ally tube is incorporated in to act as a hub centre.
. my first test effort looked great from above 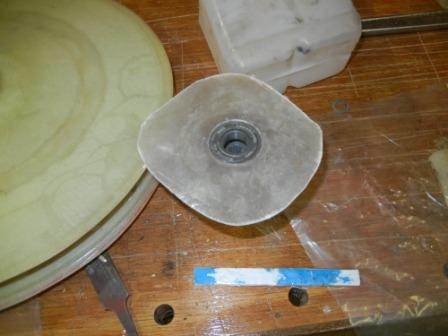
,and rather agricultural from the side(no offence intended chook) 
but seems to be beefy enough. the bearing sat rather nicely when fitted next day...........but when it was placed in the sunand heat,something we get a bit of on a salt lake, the bearing slipped out.
tonight Ive machines another 0.1mm off and built version 2 and also beefed it with a ring of carbon and some finely chopped carbon rovings. this is supposed to stabilize the whole affair
That is looking pretty good. I am glad you worked out the ally rims, The steel ones are hard to find now so we now have another option. Keep an eye out for those busted plastic trotting wheels, I could use a couple of centers for the 26" wheels. I use scaff tube in the 20" have never had a problem with it as a center.
Cheers
Vic
having done all the work to get the poly bearing housings sorted , TP1 turned up some 46mm OD ally with 6mm!!!!!!wall, so after this set of wheels is done i will work on an ally hub![]() meanwhile back in the bookcase building room..........
meanwhile back in the bookcase building room..........
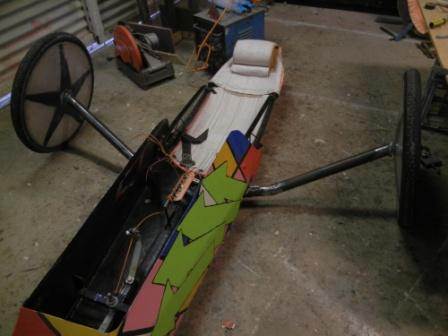
Ive layed up the first disk, thank you Tp1 and wedgetail for your assistance,this has been pulled out next morning so i can lay up side 2and put it all together. a good book to read between bit going off might be a plan.

after the next disk has been layed up the rim has been glued and also the 5 ribs(72degrees ,in case you were wondering. the ribs were cut from some sheets of 2layers of chopped strand that i layed up earlier in the week,on a sheet of galv house flashing. as it had a folded edge I was able to incorporate that into a face that can be glued to
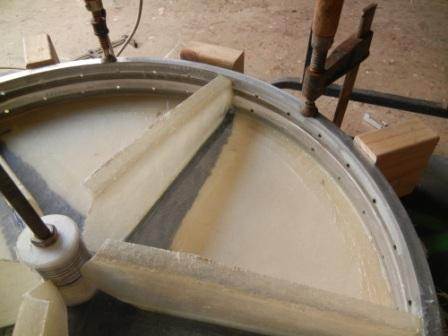
ribs and rim glassed in and glue beads ready to fit the second disc![]()
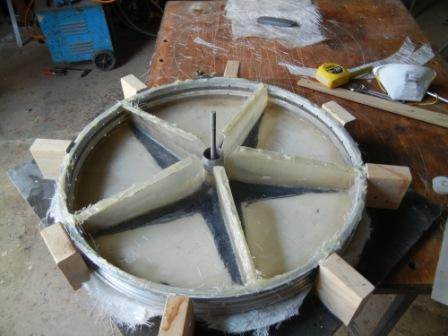
glued ,clamped and beer o'clock.
in between all these fiddly jobs we managed 1 driving lesson,a BBQ picknick in the park , changing the water in the pond and playing with our new frog![]()
all in all a great day.
hard thing is not to go out and be tempted to unclamp early![]()
Duhoiyah! Ah is there any reason some of the smaller Motor Bike Rims can not be used or am I just being silly.
Ron
Yes! I am looking seriously at some but people seam to be avopiding them, Can't understand it???
Ron
www.electricscooterparts.com/wheels.html
Front
Front Wheel For All Razor Dirt Rocket MX350 Electric Dirt Bikes
Front wheel for all versions of the Razor Dirt Rocket MX350 electric dirt bike. Includes heavy-duty aluminum alloy rim, two wheel bearings, inner bearing spacer, axle, and 12-1/2"x2-3/4" knobby tire and tube. Works with 12-1/2"x2-1/4", 12-1/2"x2-1/2", and 12-1/2"x2-3/4" tires and tubes.
Item # WHL-350F
Replacement front wheel for all versions of the Razor® Dirt Rocket MX350 electric dirt bike.
$29.95
more fun building my own. Rims from the tip, hubs from broken trotting wheels a bit of fiberglass and away you go.![]()
pulled apart rim number 1,cleaned it up ,put it on a shaft ,spinned it ,binned it![]()
fortunately it didnt fit, so over a few beers,I had a think about why it didnt come out right, and cut a peice out of my mold, replaced it with a machined nylon base , to force the centre to be square, and then went to work on wheel 2![]()
the centres of the first wheel had got out of alignmentin the mold, but being a resin/fibre hub , I was able to sit a router over the bearing housing , gap it out then refill with an epoxy/chopped carbon mix. I then slid in the nylon plug from the mold,bolted it tight and came back afew hrs later to have a lovely straight wheel![]() . meanwhile Id started on the 20" model
. meanwhile Id started on the 20" model![]()
some things were just meant to be![]()
Hi Landyacht,
Interesting thread. There is a girl at Bendigo Senior secondary college who has won a prize recently making recumbent carbn fibre wheels. Bronte McDonald. Ended up with $2000 cash from the Inventors ABC program recently. Foam cored polyurethane with carbon prepreg. Early failures were interesting. I saw them blow up in a race situation dramatically in 2010. Later versions were better and did the job. Not bad for a 16 year old.
these are definitely a budget effort, but the experiments with the layups were a real eye opener.
there is about $25 carbon fibre in each wheel,and I tink the strong point is using Vics idea of laying bike rims into the layup.
I fished the test axles today . Im using my regular class 5 with some special axles to fit the wheels on,Plan tommorrow is to go out to the clay panand try to destroy them with some hell side loads[}:)]
I havent touched the front end,or fitted the 20".
1 test at a time![]()
well heres the test rig in action
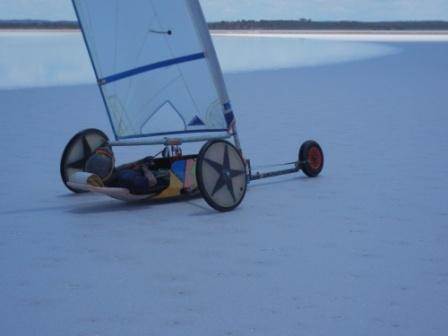
the first couple of turns were really harrowing as I was expecting to total the wheels . I ended in the drink first gybe.
after that i bit the bullet and just pushed them, wore ou the buffed tyre in a day![]() , lots of 2 wheel sailing some 180's and a really cranking 360.
, lots of 2 wheel sailing some 180's and a really cranking 360.
with the traction of the taller wheel I could turn inside the minis with ease. I finished the day by running at speed along the bank of the causeways to pound the wheels into the erosion gullies(barely felt them)
.
next step is to run the yacht at Walyungup on the 15th Janand see what damage I can do there![]()
Vic if the idea of using the doubled rims in the wheel was your then hats off to you . its the best blooming idea in landyachting this century![]() . thank you so much for sharing it with us all on seabreeze
. thank you so much for sharing it with us all on seabreeze![]()
us old rock apes get some good ideas sometimes![]()
![]() The idea was to make a easy to make and a affordable wheel, I think we achieved that. The bike rims were the only way I could think of to stop the initial problem that I had with the fiberglass ones splitting when they got hot. The wheels that I am using now are into there third season with no problems.
The idea was to make a easy to make and a affordable wheel, I think we achieved that. The bike rims were the only way I could think of to stop the initial problem that I had with the fiberglass ones splitting when they got hot. The wheels that I am using now are into there third season with no problems.
Cheers
Vic
in that case Im not even going to have any nominations for Landsailing idea of the year, and declare you the winner. the idea is just so blooming obvious and easy.
Particularly those 20 " rims , you could whip them out over a week ,just doing little bits at a time![]()
could I have a seconder and some votes to make it all legal please![]()
![]() thats the great thing about this site we can share ideas that can only help promote landsailing
thats the great thing about this site we can share ideas that can only help promote landsailing
aus230 on average with Tyre (Heavy duty) and axle 4.5kg. Bit heaver than carbon but a dam lot cheaper. Over 4 seasons of racing I think they have turned out cheaper than wheel barrow wheels.
Reason :tires on the small wheels are u/s after 2 meetings(16 races $30) but I will probably get 4 seasons out of 1 set. (190 races $80) cost to make the wheel $60 to $80 each) and you guys know the cost of wheel barrow wheels.
cheers
vic