Hi HG
That timber work look really good
That boat is a real credit to you
Did you oil the rails along the top of the cabin as well because i would be interested to see how they turned out as i am thinking of doing mine
What type of oil did you end up using
Regards Don
Select to expand quotecrustysailor said..
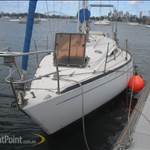
looks like someone stole your rig and staunchions, rough neighbourhood?
you cant fit it under the Neapean highway with masts on . ![]() There at Oz spars at the moment . will be bringing the home for refurbishment and a paint later on .
There at Oz spars at the moment . will be bringing the home for refurbishment and a paint later on .
I have to remove the stanchions base I want to reseal everything on deck . Just another Job on the list of many while at the marina.
My hands need a rest there cracked as and sore after the weekend of scrubbing and sanding.
HG , she is coming up a treat ! Thanks for all the pics and commentary too , interesting Internet reading .
Select to expand quoteDonk107 said..
Hi HG
That timber work look really good
That boat is a real credit to you
Did you oil the rails along the top of the cabin as well because i would be interested to see how they turned out as i am thinking of doing mine
What type of oil did you end up using
Regards DonSelect to expand quotecrustysailor said..
looks like someone stole your rig and staunchions, rough neighbourhood?
Donk I used Watsons wood cleaner and a bosch heat gun to dry on a low heat and Watsons clear wood oil as recommended by South Ace. a lot lest messy than what I had originally while bouncing up and down on a swing mooring ![]()
Select to expand quoteHG02 said..
My hands as sore as from working on the boat so much there cracked badly . Might have to take it easy next week
I found that my hands suffered heaps too when using solvents, abrasives, constant washing and as I wear rubber gloves at work it was really important for me not to get cracked hands ( as they don't heal well under gloves) and over the years I tried lots of barrier creams and hand creams.
None worked better than :
The Body Shop, Hemp Hand Protector, 100 ml tube.
I'd put it on in the morning and work it in well and do it again last thing at night. A tube lasts a long time too!
Might be worth trying.
Cheers
J
PS : Driftwood looks great!!!
Select to expand quoteHG02 said..
Donk107 said..
Hi HG
That timber work look really good
That boat is a real credit to you
Did you oil the rails along the top of the cabin as well because i would be interested to see how they turned out as i am thinking of doing mine
What type of oil did you end up using
Regards Don
crustysailor said..
looks like someone stole your rig and staunchions, rough neighbourhood?
Donk I used Watsons wood cleaner and a bosch heat gun to dry on a low heat and Watsons clear wood oil as recommended by South Ace. a lot lest messy than what I had originally while bouncing up and down on a swing mooring ![]()
Hi HG
Was that the clear furniture oil
The reason I ask is on the web site it says that the clear oil isn't recomended for direct sunlight www.feastwatson.com.au/consumer/products/exterior/product-details/1555 but they recommend one of their coloured furniture oils instead
It might just mean that you have to treat it more frequently
Regards Don
Have not done the hand rails yet Donk mine are weathered as well I slapped a coat or two of sikkens on them when I first got the boat to keep them oiled. But I will do the port side next scrubb and clean and then do the timber on that side then the cabin roof will get done as I have to remove the solar panel to do it so I thought Id do the hand rails then . Once I get the hatch cover back on I can sort out permanent stainless brackets for my solar panel as I intend to raise the back of the panel and move the solar panel back over the hatch so any rain runs off . So I need to measure what height I need , didn't do it before I took the hatch cover off . Rain never crossed my mind glad I temp fitted the panel to bring this problem out . Thinking about it I might find a product that beads water use to use some thing when I road bike in the rain years ago on my bike helmet visor. that might help to run rain off and help keep the panel cleaner as well.
Select to expand quoteandy59 said..
Thanks for the pics of the engine repaint Cisco, thats another job on the list for me.
The result is worth the effort. I got my top coat on today in Gold Hammer Tone.![]()
When an engine comes from the factory it is all new metal and is usually just hit with spray paint top coat without being primer coated.
The paint they use no doubt has an "etch" component in it and that is why it stays there for so long. The problem is that it is probably painted by a robot and therefore paint does not get to every surface of the fully assembled engine, eg, between the starter and the engine block or between the starter solenoid and the starter motor, just to name a couple of places.
What happens then when the engine has been in service for some time in the marine environment, the unpainted areas corrode and the corrosion creeps under the edge of the paint blowing it off.
So when your engine has a bit of age on it and is starting to look a bit daggy, you have two options. You can go through the whole process of preparation and painting like I am doing,
OR
Regularly spray your engine with CRC, WD40 etc (just kerosene in a spray can), give it a bit of a wire brush where needed and then wipe it down with a rag soaked in a mixture of oil and diesel. Doing this will not make your engine look like new but will keep it looking reasonably fresh.
Whatever you do, don't go hitting your engine with a spray can of so called "engine enamel". It makes the engine look really awful and cheap and shows you up as a person who has not a clue about marine engines.
Select to expand quoteHG02 said..
Have not done the hand rails yet Donk mine are weathered as well I slapped a coat or two of sikkens on them when I first got the boat to keep them oiled. But I will do the port side next scrubb and clean and then do the timber on that side then the cabin roof will get done as I have to remove the solar panel to do it so I thought Id do the hand rails then . Once I get the hatch cover back on I can sort out permanent stainless brackets for my solar panel as I intend to raise the back of the panel and move the solar panel back over the hatch so any rain runs off . So I need to measure what height I need , didn't do it before I took the hatch cover off . Rain never crossed my mind glad I temp fitted the panel to bring this problem out . Thinking about it I might find a product that beads water use to use some thing when I road bike in the rain years ago on my bike helmet visor. that might help to run rain off and help keep the panel cleaner as well.
hgo2 A good cheap way to bead water on glass or Perspex surface is to put a few drops of hair shampoo or dishwashing liquid on a tissue and rub it onto the screen and then dry wipe it with another tissue,I know this works on bike visors as I use it often. catch you later jm
Select to expand quotetheace said..HG02 said..
Have not done the hand rails yet Donk mine are weathered as well I slapped a coat or two of sikkens on them when I first got the boat to keep them oiled. But I will do the port side next scrubb and clean and then do the timber on that side then the cabin roof will get done as I have to remove the solar panel to do it so I thought Id do the hand rails then . Once I get the hatch cover back on I can sort out permanent stainless brackets for my solar panel as I intend to raise the back of the panel and move the solar panel back over the hatch so any rain runs off . So I need to measure what height I need , didn't do it before I took the hatch cover off . Rain never crossed my mind glad I temp fitted the panel to bring this problem out . Thinking about it I might find a product that beads water use to use some thing when I road bike in the rain years ago on my bike helmet visor. that might help to run rain off and help keep the panel cleaner as well.
hgo2 A good cheap way to bead water on glass or Perspex surface is to put a few drops of hair shampoo or dishwashing liquid on a tissue and rub it onto the screen and then dry wipe it with another tissue,I know this works on bike visors as I use it often. catch you later jm
cheers Ill try it
Select to expand quoteDonk107 said..HG02 said..
Donk107 said..
Hi HG
That timber work look really good
That boat is a real credit to you
Did you oil the rails along the top of the cabin as well because i would be interested to see how they turned out as i am thinking of doing mine
What type of oil did you end up using
Regards Don
crustysailor said..
looks like someone stole your rig and staunchions, rough neighbourhood?
Donk I used Watsons wood cleaner and a bosch heat gun to dry on a low heat and Watsons clear wood oil as recommended by South Ace. a lot lest messy than what I had originally while bouncing up and down on a swing mooring ![]()
Hi HG
Was that the clear furniture oil
The reason I ask is on the web site it says that the clear oil isn't recomended for direct sunlight www.feastwatson.com.au/consumer/products/exterior/product-details/1555 but they recommend one of their coloured furniture oils instead
It might just mean that you have to treat it more frequently
Regards Don
Donk
I am going to keep using it see how it goes as for me when on the boat the Watsons clear when your applying it out on a swing mooring or just floating about makes sense as I can just use a cloth to apply it and crawl around the deck and rub it in with out concern of staining the fiberglass if I slip . Even if I do have to apply more often its a reasonably quick job ![]()
Package coming Donk tomorrow Thought Id lost it
sprayed CT18 all over her yesterday preparing for the rain to wash it off. real good boat cleaning system.
installed new compass.
Select to expand quotecisco said..andy59 said..
Thanks for the pics of the engine repaint Cisco, thats another job on the list for me.
The result is worth the effort. I got my top coat on today in Gold Hammer Tone.![]()
When an engine comes from the factory it is all new metal and is usually just hit with spray paint top coat without being primer coated.
The paint they use no doubt has an "etch" component in it and that is why it stays there for so long. The problem is that it is probably painted by a robot and therefore paint does not get to every surface of the fully assembled engine, eg, between the starter and the engine block or between the starter solenoid and the starter motor, just to name a couple of places.
What happens then when the engine has been in service for some time in the marine environment, the unpainted areas corrode and the corrosion creeps under the edge of the paint blowing it off.
So when your engine has a bit of age on it and is starting to look a bit daggy, you have two options. You can go through the whole process of preparation and painting like I am doing,
OR
Regularly spray your engine with CRC, WD40 etc (just kerosene in a spray can), give it a bit of a wire brush where needed and then wipe it down with a rag soaked in a mixture of oil and diesel. Doing this will not make your engine look like new but will keep it looking reasonably fresh.
Whatever you do, don't go hitting your engine with a spray can of so called "engine enamel". It makes the engine look really awful and cheap and shows you up as a person who has not a clue about marine engines.
**** I was going to use engine enamel! Thanks for the tip.
Spraying the engine with lanolin while it is hot is one of the better ways of keeping it in good nick. Careful with the paint. Most problems you will encounter usually are caused by small paint flakes from when you crack injector pipes etc. These particles can land anywhere.
Select to expand quoteRamona said..
Spraying the engine with lanolin while it is hot is one of the better ways of keeping it in good nick. Careful with the paint. Most problems you will encounter usually are caused by small paint flakes from when you crack injector pipes etc. These particles can land anywhere.
Right on the mark Ramona. Paint is good but it can be really bad, on bolt and nut hexes and especially bad on threads. I have snapped or torn the thread on bolts more than once due to excessive paint.
A little known fact is that, when tightening threads, nuts or bolts, 40% to 60% of the torque applied is consumed by friction in the threads if they are not lubricated, therefore a proportionate amount of the clamping power of the thread (a helical wedge) is lost.
Some people say you should never oil or grease the wheel studs on your car because it makes the nuts easier to come undone.
I always grease my wheel studs on my cars and I have never had a wheel nut come undone yet.
Today I drilled the hole in my engine bed next to the snapped off s/s coach screw that was in there and managed to get a good clamp of the flexible engine mount to the engine bed.
I have said in a previous post that I intend installing solid (non flexible) engine mounts. As desirable as this is, it is not looking like it will be practical due to the space I have to work with.
The type of flexible engine mounts I have are a concentric cup type as opposed to the bridge type mounts that are common.
Study them in this pic:-

On their own, the mounting bolt can be moved quite easily but once they are tightened to the engine brackets (which have elongated bolt holes) they become very firm.
As with all things boating, they do not have an unlimited life. If with "regular maintenance" that all things boating need, these mounts should be good for 5 to 10 years. The main issue is to prevent the metal part of them from rusting away.
Stay tuned for more of Cisco's "Engine Hints and Tips". ![]()
Select to expand quotecisco said..
Some people say you should never oil or grease the wheel studs on your car because it makes the nuts easier to come undone.
I always grease my wheel studs on my cars and I have never had a wheel nut come undone yet.
I have always greased my wheel studs as it's the only way to get the correct torque loading on it and as you point out Cisco, you will never lose a wheel because of it.
I added the original port light lexans over the top to indicate what I have to fill in also this first photo is the minimum thickness
Is around 3 inches so if I add a spacer to the inside to alow for the cedar cabin sides and also add a teak spacer so the ends of the cedar are underneath the teak port light spacer that should take up around 2 inches roughly leaving a 1 inch teak spacer for the exterior of the port light
Went and watch Bob Dylan perform tonight so this is a quick post ![]()


I have mentioned before that I prefer solid mounting of engines. Solid mounting requires accurate engine alignment without which serious breakages can occur.
Solid mounting of my engine is difficult due to space constraints, but not impossible. I will probably do it some time in the future but not at the moment because with it's current set up I am not able to get the required accuracy of engine alignment.
The problem is that due to the propeller shaft length the propeller is only about 10 mm behind the P bracket which means the closest I can draw the prop shaft flange to the gear box flange is 25 mm when the flexible coupling is removed. This makes it almost impossible to get an engine alignment within 3 to 6 thousandths of an inch.
There are two alignments that need to be done as in the illustration. The upper being radial and the lower being axial.

The process is one of narrowing it down until an acceptable alignment is reached. Quite often doing one alignment puts the other one out again. The best tool I could use was a 150 mm (6 inch) steel rule.
First off is to clean the flange edges and faces of paint and dirt. Then in the horizontal plane adjust using the slots in the engine mount brackets to get both alignments as close as possible in that plane. In the vertical plane use the adjustment nuts of the engine mounts counting the number of flats of the nuts so as to have a measure of how much adjustment is made on each mount.
Tighten the lock nuts and recheck the alignments.
The radial alignment I measured by placing the straight edge over the edges of the flanges both sides plus top and bottom. The axial alignment I achieved by measuring the distance between the flange edges side to side and top to bottom.
Eventually I got my alignments to within half a millimetre which I deemed acceptable. A confirmation of the alignment is how freely the prop shaft can be turned by hand when it is coupled up again.
If you have got it right your stern gland will probably drip more freely as mine did, so it needed to be adjusted up as well.
I hope this information is useful to you guys.
Cheers Cisco
I just place the new port light into the existing cut out. The cut out line at the top of the cabin is not parallel as the original port lights have a tapper so I need the square the cut out up before any thing.
The stern original port light cut will be a little wider than the forward cut out so that also will be rectifying .
I think Ill take my horizontal measurement from the cabin top and use that .
When the original port light were fitted the cut out appears to be measured from the deck up and this makes the old port lights lower in the center and higher on either end .
Also the forward origianl port light narrows as it goes forward ![]() dose that make any sense
dose that make any sense ![]()
Teak spacers will be made for both side internal and external trim. I think that will lift the cabin side with the trim also assist in takening up some width of the new port lights with out modification . The can be 50 mm wide or more so that will work OK so its manly the teak spacers and filling in the cabin sides to suit the new port lights


Makes me feel Ive achieved some thing when I look at these two photos.
She will get turned at the weekend and Ill start cleaning and scrubbing the port side and also If theres time sand and oil the brite work Rain on Sunday dam it ![]()
Select to expand quotecisco said..
I have mentioned before that I prefer solid mounting of engines. Solid mounting requires accurate engine alignment without which serious breakages can occur.
Solid mounting of my engine is difficult due to space constraints, but not impossible. I will probably do it some time in the future but not at the moment because with it's current set up I am not able to get the required accuracy of engine alignment.
The problem is that due to the propeller shaft length the propeller is only about 10 mm behind the P bracket which means the closest I can draw the prop shaft flange to the gear box flange is 25 mm when the flexible coupling is removed. This makes it almost impossible to get an engine alignment within 3 to 6 thousandths of an inch.
There are two alignments that need to be done as in the illustration. The upper being radial and the lower being axial.
The process is one of narrowing it down until an acceptable alignment is reached. Quite often doing one alignment puts the other one out again. The best tool I could use was a 150 mm (6 inch) steel rule.
First off is to clean the flange edges and faces of paint and dirt. Then in the horizontal plane adjust using the slots in the engine mount brackets to get both alignments as close as possible in that plane. In the vertical plane use the adjustment nuts of the engine mounts counting the number of flats of the nuts so as to have a measure of how much adjustment is made on each mount.
Tighten the lock nuts and recheck the alignments.
The radial alignment I measured by placing the straight edge over the edges of the flanges both sides plus top and bottom. The axial alignment I achieved by measuring the distance between the flange edges side to side and top to bottom.
Eventually I got my alignments to within half a millimetre which I deemed acceptable. A confirmation of the alignment is how freely the prop shaft can be turned by hand when it is coupled up again.
If you have got it right your stern gland will probably drip more freely as mine did, so it needed to be adjusted up as well.
I hope this information is useful to you guys.
Cheers Cisco
Hi Cisco
Do you have any vibrations throughout the rev range with the solid engine mounts
Regards Don
Hi HG
I actually assumed the mine and yours shared the same window shape but now I realise they are completely different
Regards Don
 [/img
[/img

Yes Donk
I noticed that a while ago . Your boat port light cut outs the horizontals are parallel mine are not on both port lights.
Ill think about it for a while and do some research but I cant see why the port light thickness cant be altered
Yesterday morning. My yacht on the right. Sampson C Lord 54 foot staysail schooner sank at her mooring. In the photo you can see the recovery team in the blue boat. They have rigged a cable into the trees in the scrub. The plan was to pull her upright, pump out the water and move here over to the bank between my yacht and the other concrete yacht to the left in the photo. There will be a very good boat for sale very cheap soon! Yes there is insurance.
[URL= .html]
  [/URL]
Hi Ramona
That is a shame to see
Did it have any history of taking water in or was it just a one off failure that caused it
Regards Don