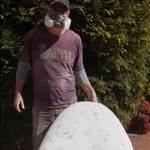
Soooo.... a 28 year addiction to the wind has led me to build my first windsurf board. I have had a boom in my hands for close to 15 years when I got into kitesurfing but the bug is still in me it seems. I have shaped the odd longboard and a kiteboard but now I want to try my hand at vacuum sandwich tech.
This one is based on the JP xcite ride 135L. 77cm wide and 252cm long.
I had the side profiles cnc'd and then screwed them onto the EPS block..... hotwired the profile and then used the top profile to trace the shape. Then carefully cut away from the line with a jigsaw an then freed the last bits with a long handsaw.


Start to work in a 2.5mm VEE and then a slight concave from near the nose to the widepoint to help absorb chop.

Concave and VEE in nose area.


Who'd have thought catfood could be so handy???

Thanks for sharing. Something I've been looking at a fair bit on youtube lately. Look forward to seeing the process.
OK - more work done. Vacuumed on the bottom 5mm pvc. This was a helluva task and I struggled wetting out the carbon T-stringer and 50 gsm glass. I think it was too hot and my resin started to gel really fast, I panicked and really did not enjoy that job. The vac bag was also leaking and it took me a while to get the vac pump cycling without running continuously. If I duffed this stage then I could have a delamination issue down the line. Oh well....I suppose this is how you learn.
I have carried on and started to clean/shape up the lower rail. Then I tackled the hotwire cuts on the deck and upper rails.
I am going to organise a larger wetting table and try and do the resin/glass work very early in the morning when its a bit cooler. I have also ordered a vacuum breach and a better way to seal the vac bag.


Select to expand quoteDar said..
Soooo.... a 28 year addiction to the wind has led me to build my first windsurf board. I have had a boom in my hands for close to 15 years when I got into kitesurfing but the bug is still in me it seems. I have shaped the odd longboard and a kiteboard but now I want to try my hand at vacuum sandwich tech.
This one is based on the JP xcite ride 135L. 77cm wide and 252cm long.
I had the side profiles cnc'd and then screwed them onto the EPS block..... hotwired the profile and then used the top profile to trace the shape. Then carefully cut away from the line with a jigsaw an then freed the last bits with a long handsaw.
Start to work in a 2.5mm VEE and then a slight concave from near the nose to the widepoint to help absorb chop.
Concave and VEE in nose area.
Who'd have thought catfood could be so handy???
Dear Dar,
I support your home made board. Be careful while working with epoxy. Always use a good quality mask.15 years ago I had tried to make my own board however chemicals made me sick. I will follow your new photographs.
Melih.
Select to expand quote
Dear Dar,
I support your home made board. Be careful while working with epoxy. Always use a good quality mask.15 years ago I had tried to make my own board however chemicals made me sick. I will follow your new photographs.
Melih.
Thanks Melih.... sure will be careful with the epoxy.
Hi Dar,
I'm similarly a long time windsurfer recently made 1st board using vac bagging technique (made 2 urethane boards in the early 90s)
I also had dramas with the bottom lamination - and only appreciated afterward that it is the single most important step! ![]() As you said- live and learn... If I was to do another one I was wondering if:
As you said- live and learn... If I was to do another one I was wondering if:
1) just laminate on the bottom cloth in a single step, then laminate on the pvc (rather than doing them tongether) ?
2) maybe this is one area worth using a stiffer material - maybe even 6oz carbon, laminate that onto the bottom of the blank, then maybe even fill it to get a perfectly smooth surface to laminate on the bottom pvc.
I also reckon you should laminate on the outer glass on the pvc before laminating anything on the deck because the styrofoam compresses so much under vacuum... bit undecided about this though... but what happened to me was that I did bottom inner glass and pvc, then inner glass and pvc on the deck&rails, then outer glass on deck then final step was outer glass on bottom- the board came out of the bag with a concave bottom (not flat) as the styrofoam had compressed into deck under vac ![]()
![]() - ended up having to fill up to 5mm in places to get the bottom flat again. The inner glass wasn't strong enough to take the pressure on the bottom while laminating on the outer glass
- ended up having to fill up to 5mm in places to get the bottom flat again. The inner glass wasn't strong enough to take the pressure on the bottom while laminating on the outer glass
my board had a perfectly flat bottom - which is structurally the weakest (concaves and vee gives a bit structural strength to the bottom laminate) and I only used 3mm pvc - you're using 5mm which will be lots stronger (I was on a tight budget !)
I used a rocker table - are you using one ? (would love to see a photo of it)
FYI on the deck I used (from outside to inside) 6oz E-glass | 3mm gurit pvc 80kg/m3 | 4oz E-glass - and then 11oz carbon twill under feet and around nose. I'm pretty happy with the deck so far.
Select to expand quotebrett_perth said..
Hi Dar,
I'm similarly a long time windsurfer recently made 1st board using vac bagging technique (made 2 urethane boards in the early 90s)
I also had dramas with the bottom lamination - and only appreciated afterward that it is the single most important step! ![]() As you said- live and learn... If I was to do another one I was wondering if:
As you said- live and learn... If I was to do another one I was wondering if:
1) just laminate on the bottom cloth in a single step, then laminate on the pvc (rather than doing them tongether) ?
2) maybe this is one area worth using a stiffer material - maybe even 6oz carbon, laminate that onto the bottom of the blank, then maybe even fill it to get a perfectly smooth surface to laminate on the bottom pvc.
I also reckon you should laminate on the outer glass on the pvc before laminating anything on the deck because the styrofoam compresses so much under vacuum... bit undecided about this though... but what happened to me was that I did bottom inner glass and pvc, then inner glass and pvc on the deck&rails, then outer glass on deck then final step was outer glass on bottom- the board came out of the bag with a concave bottom (not flat) as the styrofoam had compressed into deck under vac ![]()
![]() - ended up having to fill up to 5mm in places to get the bottom flat again. The inner glass wasn't strong enough to take the pressure on the bottom while laminating on the outer glass
- ended up having to fill up to 5mm in places to get the bottom flat again. The inner glass wasn't strong enough to take the pressure on the bottom while laminating on the outer glass
my board had a perfectly flat bottom - which is structurally the weakest (concaves and vee gives a bit structural strength to the bottom laminate) and I only used 3mm pvc - you're using 5mm which will be lots stronger (I was on a tight budget !)
I used a rocker table - are you using one ? (would love to see a photo of it)
FYI on the deck I used (from outside to inside) 6oz E-glass | 3mm gurit pvc 80kg/m3 | 4oz E-glass - and then 11oz carbon twill under feet and around nose. I'm pretty happy with the deck so far.
Sounds like you were using too much vac? I am only between 0,2-0,3 Bar (5-9 InHg). Anything higher than 10-11 InHg will start to crush the EPS.
I don't use a rocker table but just a rocker spine for support (no space for a table). The guys on here advised me to use a T-stringer made of 6OZ carbon on the bottom to give the rocker a bit of support during the build which I did.
I also wondered about doing the glass and then the pvc after but in my mind you'll get a better bond if you do them together. I don't think its complicated but on your first bash its a bit daunting as I ended up mixing and pouring several times and everything got sticky and messy and its no fun when its not a smooth operation. You also run out of space to work very quickly and that makes everything 10x harder.
on the deck I plan to lay up......(from outside to inside) 4oz E-glass | 6 OZ Carbon | 3mm gurit pvc 80kg/m3 | 2oz E-glass - and then 6oz carbon twill under feet, up to mast base and around nose.
Did you heat-bend the PVC or did you cut and tape to prevent breaking?
More shaping pics......


yeah - I was up around 15 inHg, but my gauge is at a t-join off the hose, so I always thought the pressure would be lower in the actual bag... and I wanted a strong clamp... and I'm a hack !
Thanks for sharing your thoughts - your board is looking great, you've done the most fun bits now - I started to get very over my build towards the end (but that's my personality).
I cut the pvc, and found that worked OK (and 3mm is reasonably easy, I would find it difficult to bend anything thicker I reckon)... though it would be heaps easier with a 2nd pair of hands (if you can get a mate to help). I think your board will be very strong with those materials.
From what I have heard 15 InHg is where you will crush eps. Pity.
Its hard work from here on because its messy and you need to be thorough and precise. I am however viewing this project as school/learning fees and I hope to get lucky with a nice build. Some say you should not use carbon on your first build but I find carbon fiddly to work with because it falls apart and is generally high maintenance so I reckoned I might as well just jump straight in and learn as much as I can.
My first epoxy board was a Jonathan Paarman (legendary south african big wave surfer) custom slalom. I think it was around 9'6" and it was just a few layers of glass over foam. I had that board for years during uni. My best mate Murray, had one as well. We grew up in the interior where there were only murky farm dams and almost never any wind. When we got to cape town for Uni we were in paradise with daily wind and lots of rampy waves....HEAVEN. Our slalom boards quickly became "wave jumpers" where we used to destroy the finbox regularly so we had to trip into cape town every month or two to visit JP. He would always crap us out for jumping his slalom boards but hey..... thats all we wanted to do back then. He eventually glassed 2 meranti stringers to support the box but we toasted that setup as well. The tech back then was so rudimentary.... I remember the deck going real soft and we eventually creased our boards with the finboxes intact haha...... here's hoping my board will be good and strong and I definitely intend to forward loop it first chance I get! Like I said I have not had a boom in my hands for over 15 years so its going to be interesting.
In the bag on Friday night.... worked from about 4pm to 12am.... slog but was excited.....
It all looked ok when I took it out the bag sunday morning but I soon realised I have a lot of fixing to do. I think I did not cut enough "darts" even though I bent the pvc everywhere with a heat gun. I really thought the vacuum would take care or the small imperfections. I have small areas of delam and loose pvc that I have to clear away and fill with resin/microballoon mix. Its not ideal and its a crapload of work but hey as long as I learnt something. Any recommendations on how I should fix the patches?
Layup was 200g CF at pads(with T-stringer), fin,mast and nose. Then 200g CF from tail to 1.8m then 50g FG with 3mm PVC.


All I can say is cut lots of darts!
I ended up searching for soft loose spots and tore them all up and had to patch them up with CF and microballoons. Then relayered the PVC on with thick microballoon and resin mix and then finally filled gaps with MB/resin mix. This has probably set me back about 2 weeks so I hope I do a better job next time. The pro builders must be having a good chuckle by now.


Its a fine line between too much vacuum and not enough.
Dont know if youve seen Dar, my last board build www.seabreeze.com.au/forums/Windsurfing/Wave-sailing/Started-shaping-my-new-waveboard?page=1
My daily go to ride thats still going strong.
Nice looking board Dar. Only advice I would give is to not cut the PVC. When you make the cuts it's like monofilm and tears really easily.
Make a paper outline pattern of your tuck line and then transfer to the PVC. The more accurate you get the top PVC shell the less vacuum pressure you'll need and you'll also have less filling and sanding to do afterwards.
Keep the pics coming, always good to see a board built :)
Select to expand quoteR1DER said..
Its a fine line between too much vacuum and not enough.
Dont know if youve seen Dar, my last board build www.seabreeze.com.au/forums/Windsurfing/Wave-sailing/Started-shaping-my-new-waveboard?page=1
My daily go to ride thats still going strong.
Thanks Rider.... I have seen it. It was one of the posts that got me excited enough to start my own build.Select to expand quotehoop said..
Nice looking board Dar. Only advice I would give is to not cut the PVC. When you make the cuts it's like monofilm and tears really easily.
Make a paper outline pattern of your tuck line and then transfer to the PVC. The more accurate you get the top PVC shell the less vacuum pressure you'll need and you'll also have less filling and sanding to do afterwards.
Keep the pics coming, always good to see a board built :)
Yeah.... I did not mind the cuts tearing too much but considering the amount of filling and repairing I had to do I would have done a thousand cuts to get a solid deck all round.
So what you are saying is if I get a perfect fit with nothing going over the tuck line I won't have any problems?
Yep, If you have the outline of the PVC as close as possible to the tuck line it makes it a lot easier. I usually have it about 5mm past the tuck line and cut the excess off once it comes out of the bag.
Thanks Hoop. I've been hoping some of the more experienced builders would comment.
Another thing I have been wondering is how the overlapping of the deck and bottom CF and glass will affect the sharp rails. Will it dull them a lot, ie.. must I limit the layers on the overlap? Does the CF wrap close enough under vacuum?
You're best off putting a small radius on any sharp edges before you laminate. This makes it easier for the glass/carbon to wrap around. You can then build up the rails with the filler coat for final finish shaping.
I've been thinking to do some basic videos of some of these things. It's much easier to show like that than to write it .
I know exactly what you mean, thanks Hoop!
Did some more sanding and cleaning up last night after work. Still a few more dents to fill and sand though but back to where I wanted to be. Hopefully I'll have the mast track and inserts in by the end of the weekend.


Almost fixed up... not perfect but happy so far.
Got down to the mast box reinforcement and the inserts. Phew, lots of fiddly stuff and I need to find a ""long" router bit as I can't get lower than 25mm and I need 40mm for the mast box. I need even more for the fin box. Any ideas of alternatives? A drillbit should work on the foam or not?
I must add that routing carbon fibre is not cool at all.... the mess is unreal and I got a rash on my arms.... bloody annoying. I need to get protective overalls. Luckily I was wearing my dust mask but I will be investing in better protective clothing. I also had to spend a good hour vacuuming up all the dust everywhere.
Friday evening..... Prepping the inserts.

Bagged the mast box with a clothes storage vacuum cleaner bag.... quick n easy vac solution for small parts.

Sat morning and all the parts are dry and ready for fitting.

Routing the recesses.

Next day...monday..... and all the footstrap inserts are in and dry.

Mast and fin boxes. I prepped all the PVC reinforcing and cut the holes. The mast box is in but the courier company failed to deliver my fin on time and I did not have a spare so I will put the fin box in once I get the fin which should be today.


Fin collected. Set up levels to get the board level then lined up the laser level to get the fin at 90 degrees. I will glue it in tonight.


Got lots of work done.... nearly time for paint once I am finished sanding and filling.![]()


Thanks gents. Very happy so far.... just the weight is a bit much at 9.5kg.... oh well, it is 145L (not 135 as stated) and its my first build and I have learnt loads for the next round so.....
1st pass with 2k autopaint.... still finding pinholes and places areas that need work.... back to sanding and filling ![]() .
.


Threw some paint on the deck....
Just need to do the bottom and add a few effects and we are then ready for pads (ordered and on the way) and anti-slip.