Well I worked for Seawind catamarans for 12 years so I have plenty of experience doing gel coat repairs. I just used some old 450gm choppy for the glassing and I had some brush flocoat in the shed which had thickened so I thinned it down with some styrene monomer so that I could spray it and after curing for 2 days i rubbed it down through the grades of paper 240, 400, 600, then last 1200 then used a coarse then fine grade polish with a buffer. I was totally surprised with how well the old flocoat actually polished up because it usually doesn't come up as well as gelcoat.

I bought a few two piece stainless bracket a while ago off ebay was a little disappointed in them as when you fit a table to the top bracket the table will slope . So a couple of them were donated to the sea stainer for fixing to the engine bay. Ill modify the others I have when I want to use them to there 90 degrees when thew table is fitted . You should not have to do that but we all know E bay ![]()

Also picked up some tint for my gel coat to match in with the deck color for the weekend
Meant to add a boiler maker at work welded them for me before he started work this morning, free beers for Ryan ![]()
After the dramas of last Tuesday/Wednesday dragging the pick over to the harbour wall, getting off the harbour wall and onto the marina, assessing damage and getting anchoring things right, I have been able to turn my attention back to my engine.
I renewed the external oil line and used a bunch of cable ties to make sure all the wiring was grouped and secured so as not to vibrate or get caught up in anything and I am now pretty chuffed with the way the engine presents itself. See the pic.
I am not really chuffed with the wiring on the left of the pic. It is high on the list.![]()

Take note of the diaphragm pump fitted to the suction side of the primary fuel filter to the right of the pic. It cost about $40 but is worth it's weight in gold. When I primed the fuel system I didn't have to touch the fuel lift pump on the engine and this pump pushed the fuel through the system in about a dozen strokes. Definitely the way to go.
Also note the piece of copper pipe on the left between the sea water strainer and the sea water pump. That will disappear soon to be replaced with 90 degree elbows on the pump and strainer and a short length of hose between or just one 90 degree elbow on the pump and a curved hose from the strainer. Ideally there would be no elbows in the suction line of the pump but with the room I have I will go with an elbow rather than have a kinked hose.
Again note the water hoses on the top of the engine. I have room enough to run generic heater automotive hose rather than genuine Yanmar moulded hoses at a fraction of the cost of genuine. A further benefit is a smoother water flow.
The scrappy stuff you see to the right and behind the engine is the last remains of that self adhesive noise insulation foam. It will be cleaned up but not replaced as my engine bay is not fully enclosed. On a smaller yacht with a thumper diesel I think engine noise insulation is a waste of money.
Being tied up at the marina gave me a chance to run the engine and give it a basin trial under power. This little flic was a warm start but the cold start was nearly as good. It runs well at 1,100 rpm idle, has a rough spot around 1,300 rpm and has no problem running up to 2,500 rpm as it does in the flic.
Turn your sound on. I think it sounds fairly OK.
hI CISCO, I have an identical engine on my boat sounds ok to me .Do you have a pressure switch on your oil line,or a pressure gauge .The oil pressure alarm on my engine takes awhile to turn off, a bit to long for my liking,I will fit a pressure gauge this weekend to check if the pressure is up to scratch. catch you later .
I just have the standard oil pressure switch. They are about $100 from Yanmar and I am sure Repco could sell you one with the same thread and correct pressure range for $15 or $20.
The oil pump I believe is a trochoid type and they are usually bullet proof.
It could be that you oil filter does not have non return, so it needs to fill up before the system pressures up.
I have quite a bit of information on generic parts for the Yanmar that can save you $$$$$s. I will post it up later.
Fitted engine watchdog to our Perkins 4236. Having an audible alarm is piece of mind !

Select to expand quotecisco said..
I just have the standard oil pressure switch. They are about $100 from Yanmar and I am sure Repco could sell you one with the same thread and correct pressure range for $15 or $20.
The oil pump I believe is a trochoid type and they are usually bullet proof.
It could be that you oil filter does not have non return, so it needs to fill up before the system pressures up.
I have quite a bit of information on generic parts for the Yanmar that can save you $$$$$s. I will post it up later.
Thanks cisco that would be helpful. catch you later.
We took the boat out into the channel yesterday for engine trials after the big servicing effort.
For cold starting the Yanmar needs some accelerator lever applied until the combustion chamber gets a bit of heat into it and then it settles into a fairly smooth and stable idle at 1,100 rpm.
It has a rough spot around 1,300 rpm which smooths out at 1,500 rpm. From there on it drives well through the rev range and has it's sweet spot between 2,400 to 2,600 rpm.
There was 1/2 to 1 knot of tide running in the channel so we had to do some averaging to determine what speed we were getting out of her.
We were using an old but still reliable Magellan GPS Pioneer (20 years old???) to measure SOG and on the way out it registered 6.9 knots at 2,600 rpm. The slop in the channel would knock it off a bit but 5.5 to 6.5 knot was easy to achieve.
We gave her a full power run for 5 minutes or so trying to get up to 3,000 rpm but she would only go to 2,900 rpm. The boat did not go any faster and not wanting to tempt fate we dropped back to 2,600 rpm. The performance curves rate this engine's maximum torque and lowest gallons per horsepower hour at 2,400 rpm and it runs very smoothly at that speed.
Back in the river with flat water the two way run gave us an averaged speed of 5.75 knots which is quite acceptable for a 26.25 foot waterline length yacht. I am sure if this engine was in something like an Adams 10 it would give 7 knots plus easily.
Hi Cisco
Is 1100 rpm the correct idle speed as it sounds a little high (assuming that the tachometer is reading correct) although in the video you posted the idle speed seemed to be ok
Regards Don
It drops back a bit when the gearbox is engaged but it is smoother at 1,100 rpm.
My wife and I went out for a sail yesterday with the forcast maximum of 12 knots but we had probably 18 to 20 gusting to high 20's and it was a bit wet and wild
Aqua-Fae was hammering along at 7 knots at times to windward with the lee rail under water happy as unlike my wife who was not really enjoying getting wet and cold
Regards Don
Technically today I have completed the refit of Seaka with having put back onboard all of her gear. ![]()
Only taken me 11 months! ![]()
So what did I do:
Removed all the old paint inside back to the glass and repainted in two pack paint. [Really this took up most of the time]
Re-varnished all varnished surfaces.
Raised the sea berth 10 cm to give extra storage.
Re-cut cushions to fit alterations to sea berth.
Rebuilt the cabin table [with a chart drawer under].
Put in several extra floors to deep lockers.
Re installed all the fly screens.
Repaired the clear rain screen to the cabin entrance.
Fitted an AIS receiver.
Relocated the am & VHF radios.
Re fixed all wiring.
Fitted navigation lights to the bow and mast [combined with a deck light] for steaming.
Re arranged the switch panel for additions.
Laid a pointed floor to the cabin and engine cover.
Insulated the engine bay.
Removed all the mast winches and wire halyards.
Installed a new winch and 5 clutches so as to work from the cockpit.
Installed all new running rope to halyards and reefing.
Fitted jib down haul leads.
Fitted a simple anti-jibe system.
Replaced all standing wire rigging.
Made a new mast head fitting to accommodate the new rope halyards.
Installed a boom bag.
New bag for the cockpit Bimini.
Installed a new 100 w solar panel and SS frame.
Replaced the heap rope to my second anchor with 14 mm Braid.
Replaced the main forward bollard timber cross piece.
Installed 2 rope bags in cockpit.
Previously [01/13] I had replaced the stern cutlass bearings and realigned the engine.
Anything left to do?
Clean and polish the deck and sides.
Replace the deck safety wires.
Anti foul.
Replace the anode.


Finally finished the bottom of hull. Scraped off about 60kgs of old anti foul, ground out dodgy looking patches and re glassed/filled,
two coats of epoxy resin to seal, two coats epoxy primer. Will anti foul just before I launch it.

Made new tiller from some old hardwood, cut into 7mm strips, clamped in a jig, epoxied, shaped with hand tools.


Also fitted Navik wind vane.
Made and fitted new port lights.
Removed engine, rust treated mounts and couplings, re painted.
Replaced all hose clamps
Fitted new bilge pump, float switch and hoses.
Replaced stern bearing.
Refitted engine and re aligned with shaft, (it was a long way out of true)
Plus numerous incidental repairs.
This has taken me nearly five months with a few medical setbacks.
Now I can go through the cabin and deck and refurbish as required. I don't really care about making it too pretty, I just want it sea worthy.
I'm hoping to get it in the water in the next couple of months, then rig it. If my mooring application hasn't come through then bugger it! I'll just anchor in the Tweed River and get out sailing as often as possible.
Can't wait!![]()
That's a hard act to follow....but today i pulled my tired old sails out of napisan in the wheely bin.
Hey Presto...white sails again!!
Still have some rusty bits that ill hit with the oxalic acid on the weekend.
The good thing was...that the old sail tape covering some repairs fell off and the glue peeled off cleanly, ready for some new tape. (holes from spreader ends---- flying "ultra too big for the boat" Genoa).
Big time interesting stuff...i know.
Select to expand quoteShotchas said..
Finally finished the bottom of hull. Scraped off about 60kgs of old anti foul, ground out dodgy looking patches and re glassed/filled,
two coats of epoxy resin to seal, two coats epoxy primer. Will anti foul just before I launch it.
Made new tiller from some old hardwood, cut into 7mm strips, clamped in a jig, epoxied, shaped with hand tools.
Also fitted Navik wind vane.
Made and fitted new port lights.
Removed engine, rust treated mounts and couplings, re painted.
Replaced all hose clamps
Fitted new bilge pump, float switch and hoses.
Replaced stern bearing.
Refitted engine and re aligned with shaft, (it was a long way out of true)
Plus numerous incidental repairs.
This has taken me nearly five months with a few medical setbacks.
Now I can go through the cabin and deck and refurbish as required. I don't really care about making it too pretty, I just want it sea worthy.
I'm hoping to get it in the water in the next couple of months, then rig it. If my mooring application hasn't come through then bugger it! I'll just anchor in the Tweed River and get out sailing as often as possible.
Can't wait!![]()
Hi Snotchas
well done shes looking years younger and will be very reliable ![]()
Select to expand quotenswsailor said..
Technically today I have completed the refit of Seaka with having put back onboard all of her gear. ![]()
Only taken me 11 months! ![]()
So what did I do:
Removed all the old paint inside back to the glass and repainted in two pack paint. [Really this took up most of the time]
Re-varnished all varnished surfaces.
Raised the sea berth 10 cm to give extra storage.
Re-cut cushions to fit alterations to sea berth.
Rebuilt the cabin table [with a chart drawer under].
Put in several extra floors to deep lockers.
Re installed all the fly screens.
Repaired the clear rain screen to the cabin entrance.
Fitted an AIS receiver.
Relocated the am & VHF radios.
Re fixed all wiring.
Fitted navigation lights to the bow and mast [combined with a deck light] for steaming.
Re arranged the switch panel for additions.
Laid a pointed floor to the cabin and engine cover.
Insulated the engine bay.
Removed all the mast winches and wire halyards.
Installed a new winch and 5 clutches so as to work from the cockpit.
Installed all new running rope to halyards and reefing.
Fitted jib down haul leads.
Fitted a simple anti-jibe system.
Replaced all standing wire rigging.
Made a new mast head fitting to accommodate the new rope halyards.
Installed a boom bag.
New bag for the cockpit Bimini.
Installed a new 100 w solar panel and SS frame.
Replaced the heap rope to my second anchor with 14 mm Braid.
Replaced the main forward bollard timber cross piece.
Installed 2 rope bags in cockpit.
Previously [01/13] I had replaced the stern cutlass bearings and realigned the engine.
Anything left to do?
Clean and polish the deck and sides.
Replace the deck safety wires.
Anti foul.
Replace the anode.
NSW shes looking very nice the floor has come up a treat. The paint color goes well with the timber work inside the cabin . Well done ![]()
Wow, Scotchas and NSW have really thrown the gauntlet down! Well done!
PS: Brizzydave / others - is it okay to nappisan your sails??? My main is dirty but I'd be afraid it might degrade the thread or something. Bloody old thing but a bit of time left in it yet.

Filled in one side from the inside of the cabin the starboard side is ready for Saturday . Once thats fiberglassed I will grind and sand a taper on the out side of the port light cut outs and fiberglass the out side sand it down and start cutting out the port light holes
Hi Guys-After noticing a few here going about tidying up hoses,lines etc around the engine, I stumbled onto a product called Gates hose shaping coils.
They are an S/S coil/spring but with a 'spine' attached.
These then slip onto your cooling or fuel lines and you can then mould to the desired shape without kinking the hose, even at right angles.
Worked brilliant for me and have now dispensed with the cable ties on cable ties scenario to maintain proper hose flows.
Give it a try Cisco-about 5 bucks each at Masters.
C.R.
Select to expand quoteShotchas said..
Finally finished the bottom of hull. Scraped off about 60kgs of old anti foul, ground out dodgy looking patches and re glassed/filled,
two coats of epoxy resin to seal, two coats epoxy primer. Will anti foul just before I launch it.
Made new tiller from some old hardwood, cut into 7mm strips, clamped in a jig, epoxied, shaped with hand tools.
Also fitted Navik wind vane.
Made and fitted new port lights.
Removed engine, rust treated mounts and couplings, re painted.
Replaced all hose clamps
Fitted new bilge pump, float switch and hoses.
Replaced stern bearing.
Refitted engine and re aligned with shaft, (it was a long way out of true)
Plus numerous incidental repairs.
This has taken me nearly five months with a few medical setbacks.
Now I can go through the cabin and deck and refurbish as required. I don't really care about making it too pretty, I just want it sea worthy.
I'm hoping to get it in the water in the next couple of months, then rig it. If my mooring application hasn't come through then bugger it! I'll just anchor in the Tweed River and get out sailing as often as possible.
Can't wait!![]()
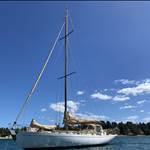
That hull looks so nice in white it is almost a shame to have to antifoul it
Regards Don
Select to expand quoteSirJman said..
I know this boat from somewhere :P
Might be time to get the paint brush out Sir J man ![]()
Select to expand quoteHG02 said..SirJman said..
I know this boat from somewhere :P
Might be time to get the paint brush out Sir J man ![]()
Aww, I've done the bottom half :P
Re taz trip...
I'm shopping in the morning and then packing. If there is enough daylight left I'll head for queenscliff, otherwise maybe a short run to syc.
Given the weather patterns I'm going to do the clockwise trip via refuge cove - deal - flinders etc.
Select to expand quoteSirJman said..HG02 said..SirJman said..
I know this boat from somewhere :P
Might be time to get the paint brush out Sir J man ![]()
Aww, I've done the bottom half :P
Re taz trip...
I'm shopping in the morning and then packing. If there is enough daylight left I'll head for queenscliff, otherwise maybe a short run to syc.
Given the weather patterns I'm going to do the clockwise trip via refuge cove - deal - flinders etc.
Have a great time Sir J man ![]()
Select to expand quoteShotchas said..
Finally finished the bottom of hull. Scraped off about 60kgs of old anti foul, ground out dodgy looking patches and re glassed/filled,
two coats of epoxy resin to seal, two coats epoxy primer. Will anti foul just before I launch it.
Made new tiller from some old hardwood, cut into 7mm strips, clamped in a jig, epoxied, shaped with hand tools.
Also fitted Navik wind vane.
Made and fitted new port lights.
Removed engine, rust treated mounts and couplings, re painted.
Replaced all hose clamps
Fitted new bilge pump, float switch and hoses.
Replaced stern bearing.
Refitted engine and re aligned with shaft, (it was a long way out of true)
Plus numerous incidental repairs.
This has taken me nearly five months with a few medical setbacks.
Now I can go through the cabin and deck and refurbish as required. I don't really care about making it too pretty, I just want it sea worthy.
I'm hoping to get it in the water in the next couple of months, then rig it. If my mooring application hasn't come through then bugger it! I'll just anchor in the Tweed River and get out sailing as often as possible.
Can't wait!![]()
Looks fantastic Sotchas
Where did you carry out all the work?
All the work done at the back of my shed on a rural property, makes life a bit easier.
The good part will be getting it back up the driveway. Coming down was precarious and had to have the crane following the semi, to lift its back end around the tight corners. A few tight sphincters also!![]()
I thinlk that sail boats should look right above and below the waterline and that one does
Regards Don