Busy time but all good! If you were over here Id love to help.
I met a guy working in the yard on the boat next to me. He's spent 30 years on the ocean, sailed them all, but no boat anymore. He's looking for delivery jobs from anywhere to anywhere. Pulled out of the 98 Hobart in time luckily but still had waves as high as hay sheds coming down on him, so I can't wait to take him out and looking forward to learning a lot from him.
Select to expand quoteAquanMarine said..
Busy time but all good! If you were over here Id love to help.
I met a guy working in the yard on the boat next to me. He's spent 30 years on the ocean, sailed them all, but no boat anymore. He's looking for delivery jobs from anywhere to anywhere. Pulled out of the 98 Hobart in time luckily but still had waves as high as hay sheds coming down on him, so I can't wait to take him out and looking forward to learning a lot from him.
pick his brains Aquanmarine .I always wished all that sort of knowledge could be passed on bit like "paste and copy" on a PC from one human to the next
maybe in a thousand year![]()
Very Very nice Paul, she's looking really good!!!!! So what did you do the other 3 days on the stand? ![]()
Select to expand quote


FreeRadical said..
Very Very nice Paul, she's looking really good!!!!! So what did you do the other 3 days on the stand? ![]()
Took photos Daz!
had to take her out for a quick spin ![]()
Pissed off went to the boat ,was going to fit a couple of ventiators beside the forward cabin hatch
Marked it out went to cut the hole out with a the saw only to find out my drill chuck was to small for the hole saw arbour![]()
Welcome to forward backwards land
Hi HG
What type of ventilators are you fitting
There is a nice looking Walker H28 moored up river from us at the moment
I took a photo on the way home but it doesn't look all that flash in the photo
Regards a Don

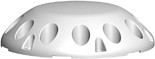
www.air-onlyventilators.com/air-only-low-profile/
 Bought a couple of these from malta via e bay Donk
http://www.ebay.com.au/sch/air-onlyventilators/m.html?item=191275698390&ssPageName=STRK%3AMEWNX%3AIT&rt=nc&_trksid=p2047675.l2562
Thought about some nice polished ones in a nice teak box . but thought it would be just my luck when I didn't need it to happen a jib sheet or some dam rope would get tangled when I absolutely don,t want any thing to happen while sailing ![]()
But Ill probably trip over these and fall of the boat instead ![]()
So Sorry loosechange. Really am. I was having a shocking day and tiredness had me in its nasty clutches. Sorry for dragging the joint down men. :-(
Bought a couple of these from malta via e bay DonkSelect to expand quotebrizzydave said..
So Sorry loosechange. Really am. I was having a shocking day and tiredness had me in its nasty clutches. Sorry for dragging the joint down men. :-(
Dave, don't sweat it, it was all meant with a smile, subtle nuances don't over very well in text. It's all good, have another rum ![]() and if you won't, then I will.
and if you won't, then I will.
Bought a couple of these from malta via e bay Donk Bought a couple of these from malta via e bay DonkCut two holes for the ventilators
Marked the inner tube of the ventilator and bought it home to shorten it should be around 1 or 2 mm proud of the deck hole

As I did not have a 95 mm hole saw and I was not paying any one $59 dolars just to cut two hole buying one so I used a 89 mm hole saw and sanded the rest out so its a nice snug fit placed it position and marked 2 mm above the deck height and went home . I quickly cut the inner tubes with a 5 inch cut off wheel.
Left my phone on board so I have no photos. Ill go back down now and pick it up
Tomorrow night Ill trial fit the unit and then silicon and screw it to the deck and its done
 dslp1
dslp1 ![]() dslp2
dslp2 ![]() ds3
ds3 ![]() ds2
ds2 ![]() ds1
ds1  ds4
ds4 ![]() ds5
ds5 ![]() ds6
ds6  ds7
ds7 ![]() o-rings
o-rings
made of silicone 3,5 x 16 – 19 units ds screw pack
made of S/St A2 2,9 x 16 – 3 units ds7 screw pack
made of S/St A2 4,2 x 16 – 6 units
M5 x 12 – 6 units
M5 – 6 units dsd screw pack
made of S/St A4 ?hoose a suitable place for your ventilator ensuring that there are no obstructions above or below the deck.Using DS7 as a template mark and cut hole through deck / roof / hatch.
DS7 requires cutting to length prior to assembly. Place DS7 in the hole and measure and mark so that 1 or 2 mm extends below roof.Trial fit DS1 and DS7 first, then DSLP2 and screw into position. Ensure that they fit correctly before proceeding.Remove DS1 and DSLP2 and refit using a suitable marine sealant, wait until the sealant hardens.
Ensure that the floating balls and the housings for the free floating balls are clear of debris and excess sealant.Fit O-rings.Complete assembly by fitting DS2, DS3 and DSLP1.Do not forget to place DS4 into position and screw to DS5 before fitting DS3. Templates for fitting


<div class="sidebar">How does it work?
<div class="textwidget">Air-Only ventilator, which is a core device for all models, let air in and keep water out via the use of spherical floats.
Operating principle: soft PVC balls float within the vent as soon as there is water on deck, along vertical guides, and form a watertight seal. As soon as the water subsides, the balls descend, letting air in again. Illustrated on pictures below. 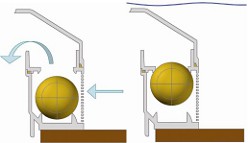
You can also add what they call a breezy either wood or plastic
as below

These two units have a computer fan inside and can be reversed air flow depending what your needs are
Feel like a sales man here ![]()

Select to expand quoteDonk107 said..
Hi HG
What type of ventilators are you fitting
There is a nice looking Walker H28 moored up river from us at the moment
I took a photo on the way home but it doesn't look all that flash in the photo
Regards a Don
Have you had a sniff around that Walker H28 yet Donk ![]() Looks a bit like a Walker Called Gum Nut .But Im pretty sure Gum Nut has a furling system.
Looks a bit like a Walker Called Gum Nut .But Im pretty sure Gum Nut has a furling system.
I wonder if its that NSW boat called celeste and some one sailed it to Tassy?
Looks like it has a hard dodger on the cabin top hard to make out
Hi HG
I haven't had a chance to have a good look at it yet
It is moored at Franklin (about 7 mins drive up the river from here) and i pass it each day on the way to work
It is not far off the river bank but i have only had a ipad to take a photo on and it is not that good at taking photo's of objects at a distance
The boat itself looks to be in really good condition and has a windvane self steering gear on the transom
Each time i have passed it this week there doesn't appear to be anyone on it so it may have been bought by one of the locals here
I will take a camera tomorrow and see of i can get some decent photo's of it and see if i can see a name on it
Regards Don
Select to expand quoteDonk107 said..
Hi HG
I haven't had a chance to have a good look at it yet
It is moored at Franklin (about 7 mins drive up the river from here) and i pass it each day on the way to work
It is not far off the river bank but i have only had a ipad to take a photo on and it is not that good at taking photo's of objects at a distance
The boat itself looks to be in really good condition and has a windvane self steering gear on the transom
Each time i have passed it this week there doesn't appear to be anyone on it so it may have been bought by one of the locals here
I will take a camera tomorrow and see of i can get some decent photo's of it and see if i can see a name on it
Regards Don
Good stuff Donk ![]()
I got my Yanmar 2 QM 15 engine going again around 5 pm today after about 3 weeks working on it and I am not happy.
It still goes "putt, putt" and not "brrrrmmmmm".
I had one of these engines in another boat and it started up on the first compression stroke and went "brrrrmmmmm" straight up after not having been run for 5 years.
On this engine, besides a lot of other stuff like painting it, major servicing etc, I have in particular adjusted the valve clearances and had the injectors reconditioned. One of them needed a new tip/nozzle ($125) and after doing the above one would expect to have a smooth running engine, but alas, no.
The next step is to remove the fuel injection pump and take it to the Doctor for phasing and calibrating.
Phasing the fuel injection pump is where it is adjusted to exactly the right point where each element of the pump is causing fuel injection at a precise point/angle of crank shaft rotation. It is the same as ignition timing in a petrol/spark ignition engine as opposed to a diesel/compression ignition engine.
Calibrating a fuel injection pump is where it is adjusted to the point where each element of the pump is injecting precisely the same amount of fuel into it's cylinder as the others.
Should this not make the engine go "brrrrmmmmm", I will commit jihad on it and take it's head off.
Cant remember which models but some of the Yanmar excavators models, you had to be careful when cracking the injector pump pipe going to the injector at the injector housing. It could turn the the part that fits into the injector pump housing causing it to alter the fuel metering. I cant remember exactly what happened to long ago for an old bloke![]() This might not be relevant to your motor Cisco
This might not be relevant to your motor Cisco
Just thought Id mention it
I know what you are talking about HG but I don't think that would happen with my engine's configuration. I will have a hard look at it though.
I will give this engine every chance to go "brrrmmmmm" before I jihad it.![]()
It would be nice to be able to afford to fit a new 3 cylinder engine. Apart from the expence it is a hell of a job to do anyway.
Select to expand quotecisco said..
I got my Yanmar 2 QM 15 engine going again around 5 pm today after about 3 weeks working on it and I am not happy.
It still goes "putt, putt" and not "brrrrmmmmm".
I had one of these engines in another boat and it started up on the first compression stroke and went "brrrrmmmmm" straight up after not having been run for 5 years.
On this engine, besides a lot of other stuff like painting it, major servicing etc, I have in particular adjusted the valve clearances and had the injectors reconditioned. One of them needed a new tip/nozzle ($125) and after doing the above one would expect to have a smooth running engine, but alas, no.
The next step is to remove the fuel injection pump and take it to the Doctor for phasing and calibrating.
Phasing the fuel injection pump is where it is adjusted to exactly the right point where each element of the pump is causing fuel injection at a precise point/angle of crank shaft rotation. It is the same as ignition timing in a petrol/spark ignition engine as opposed to a diesel/compression ignition engine.
Calibrating a fuel injection pump is where it is adjusted to the point where each element of the pump is injecting precisely the same amount of fuel into it's cylinder as the others.
Should this not make the engine go "brrrrmmmmm", I will commit jihad on it and take it's head off.
Hi Cisco
I don't suppose you did a compression test while the injectors were out of it
I wpould do this before ripping the pump off
If you have or can borrow a diesel compression gauge it will be a lot cheaper than getting the pump checked and at least you will know the condition of the top and bottom end
What are the actual symptoms of the engine problem
Regards Don
Tried to fit two ventilators after work One finished and half the other was short of screws so Ill get a few tomorrow and finish the other side


Select to expand quotenswsailor said..
Cisco,
As I said some time ago, have you checked the valve springs????
Yes I have and they are all still where they should be.
If I want to check if they all have the same tension I will have to do jihad on the engine and take it's head cleanly off. I am a peaceful man and I really want to avoid any jihad.![]()
Select to expand quoteDonk107 said..
If you have or can borrow a diesel compression gauge it will be a lot cheaper than getting the pump checked and at least you will know the condition of the top and bottom end
What are the actual symptoms of the engine problem
Regards Don
It would be nice if I could borrow a compression gauge to fit this engine.
The symptom is that it goes "Putt,putt" not "brrrrmmmm" like the last one of this particular engine model that I owned.
I am going to talk to it tomorrow and tell it that if it does not behave correctly, off will come it's head.
I have had the injectors reconditioned and taken great care with refitting them. Then I have adjusted the valve clearances and done all the other servicing items around the engine short of taking the cylinder head off.
I think the engine is running better than previously but I feel that it could still be better. Maybe I am being a bit too fussy.
I will go to the boat today, run the engine and take a short movie of it with sound and post it up here for opinions on it.
Select to expand quotecisco said..
I have had the injectors reconditioned and taken great care with refitting them. Then I have adjusted the valve clearances and done all the other servicing items around the engine short of taking the cylinder head off.
I think the engine is running better than previously but I feel that it could still be better. Maybe I am being a bit too fussy.
I will go to the boat today, run the engine and take a short movie of it with sound and post it up here for opinions on it.
Hi Cisco,
With the motor running at above low idle, crack off one injector , slowly from just cracked off to fully cracked off
Listen to see if engine runs:
a) drastically worse
b) not much change
Now try the other cylinder.
Doing this can help determine if it is just one cylinder that is being effected or both.
If one cylinder is noticeably different( the one with not much change) swap injectors and see if that swaps the bad running to the other cylinder.
If the cylinder swaps then the problem may just be the injector.
Hi Cisco
An old method of analyzing a diesel is an oil can and a few drops of oil on the exhaust manifold see how it burns off and the difference on either cylinder you do need a outlet part of the exhaust manifold right near the exhaust port as it come out of the head I'm not sure if that possible with you manifold or not but it would give you an indication of which cylinder is low on power less heat on one of the exhaust port would mean that cylinder is not working correctly .
If I happen to win tattslotto tonight expect a new 3 cly Kubota and several slabs and Id give you a hand to fit it .![]() But some how I don't think thats going to happen.
But some how I don't think thats going to happen.


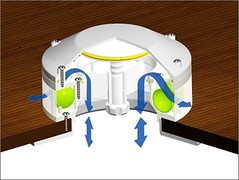
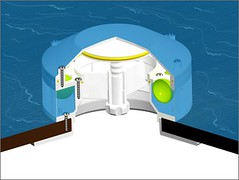
Finished fitting the port side ventilator and as I didn't post whats inside here it is
Any water coming in makes the green balls float and seal off the top. This is exactly the same in there other ventilators just the exterior changes.
I not sure if the low profile was a great choice time will tell and I can change the exterior to a full dollard later .
After fitting the ventilator I started tappering up around the port lights on the inside ready to sand back a tapper on the inside so it can be glassed . I did this and sanded all four port lights cut out back . Ever thing went according to plan till the last sesion of sanding and sheet of plastic I was using to keep the dust in a small area fell down and I didnt realize it had so Ive a very dusty interior now . So Ill spend the next few hours cleaning up and probably tomorrow as well dam it . I edges of the cut out are razor sharp I cut my finger on one of them making sure they were right
The guide I am following plus a little more below
goodoldboat.com/fitting-bronze-portlights/
Ill just seal the old port light holes up with plastic this week and start filling in the old port light cut outs next weekend if the weather is ok
I was just looking at my hatch cover and seeing how crazed it is and wondered if you could sand that out with some very fine sand paper 2000 grit
Ive done that before on computer CPU water blocks some time you buy them and there not clear and sanding them with 2000 grit and a polish after and there clear as a bell
Any one tried that or does the craze go right through the acrylic