Ok HG my turn![]()
I was pretty skeptical of your plan, and was taught if you didn't have anything nice to say...
To me windows in a boat are pretty key to it's look, and having had a Walker H28 in the family in the past, I thought they where pretty spot on as they were.
With a H28, even more so: you check the sheer, then bowsprit, windows and transom, and it's nearly iconic.
I would not have been game enough to play around to this extent.
Your changes have made the boat something special again.
That second photo even looks like a bit 'Morris' or Freedom yachts to me, very pretty and starting to be even understated.
With the stanchions off, and the new windows line, it looks ageless.
Congratulations and you should be rightly proud, she looks great, and individual.
Hi HG
She looks lovely with the port lights in place
Just a quick question
Will water collect in the port light opening when they are closed and spill inside when you open them or will it drain away instead
Regards Don
Select to expand quoteDonk107 said..
Hi HG
She looks lovely with the port lights in place
Just a quick question
Will water collect in the port light opening when they are closed and spill inside when you open them or will it drain away instead
Regards Don
Yes they will Donk unfortunately. My thoughts were to modify things to fix this problem. But Im just going to go around the ports before I open them and mop them put before opening them. I'm thinking of making plugs to fit in the out side and push into the outer rings rain protectors and maybe storm protectors.
I have thought of other ways but don't think Ill bother . Its early days yet only half done a few good sleeps might assist me .
I did think of sloping the spacers so there more vertical to compensate for the cabin sides but its quiet a large slop to contend with.
To me the simplest way it make some plugs that can be fitted and taken out when I'm on the boat. Ill see how I go .
Not much rain in North Queensland in the winter months .

As you can see the cabin sides have a large vertical slope to off set this the bottoms would have to come out a very long way .
I was thinking of making a teak fairing on the out side to help compensate this problem but a ship wright told me Id have leaking problems if I did that.
I had other ideas but Ill just go around and and mop the port lights before I open them. If I'm not on the boat for a while Ill make and fit some water proof plugs to fit in the outer rings.
South Ace suggested to make up some clears one piece for each side covering all the port lights and fix them to the cabin sides with press studs which is a nice idea and simple

Ive epoxied some 12 mm ply to the cabin side to attach the western red cedar to . Im not sure what to do here some one suggested I screw the cedar to the 12 mm ply . But to me there would be to many stainless steel screws and cup washers . The only thing behind the cedar would be a couple of pairs of tinned wire for some LED lights . I will fit in so sort of insulation behind the cedar also.
So suggestions please to attach the cedar to the ply ? I was going to epoxy them .
One other thing should I apint the rear of the cedar before I fit it with some urethane . I am hoping to just oil the facing side of the cedar.
interesting detail . my first thought is to leave the back of the cedar raw and epoxy glue and secret nail boards on . but importantly leave good air circulating behind boards, somehow.............. then oil the front
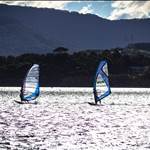
Getting ready for launch next week - Pushpit & davits finished with 520w of solar panels installed. Bimini is just sitting temporary.
80A controller showing 19.4 amps coming in from the panels. :)


can i hook my house up to your yacht please ? i have a very long extension lead around here somewhere.......
Select to expand quotespongeblob said..
Outstanding bit of window business going on there HG !!!!!!
Hi Sponge Blob
How your keeping. Ill start fitting in that stove soon cant wait, thanks to you and your help
Cheers HG02
Select to expand quoteLazzarae said..
Getting ready for launch next week - Pushpit & davits finished with 520w of solar panels installed. Bimini is just sitting temporary.
80A controller showing 19.4 amps coming in from the panels. :)
that should feed all your requirements Lazzare fits up nicely well done.
Whats that brand of the controller and panels Lazzare?
Select to expand quoteRamona said..
What's that white stuff on the ground?
Its a photo off Google Ramona there is no cold front coming ![]()
Last night I removed the crusty old anchor chain and anchor(Plough ) at the moment is living in my car boot along with a lot of other bits and pieces
The photo is part of a collection of ideas Ive saved
I think my solar panel might end up on the roof of the house I live in eventually and select some thing a little smaller
its keeping my batteries healthy thats the main thing
I better go and un pack the cr and go do some work on the boat
Have a great day every one photos tonight when I get home
Hmmmm what did I do to my sailing boat today?
Ponded about if I should buy another yacht within the next 5 years and polished my growing guitar collection!


Trail fit

The painter from work came and faired the cabin sides and I mixed up a batch of epoxy filler for him the weather turned cooler so it was slow going off so he went home next weekend he will sand it down and add two pack under coat He also added some filler over my old gage holes in the cockpit ready for next weekend .
During the week I will reduce the out rings by around an 1 inch (24.5 mm for you youngsters) also Ill easy the port light cuts out a little more after work as well .
I opened up the pack of cedar took a small pack down to the boat but decided Ill wait till the port lights are permanently fitted I don't want any rain on the cedar right now.
I still don't know what color to paint the deck and non skid thinking of a cream and a darker cream for the non skid
Meant to add the inner port lights have protective plastic on them at the moment for rough heads like me

Bought a few car loads home but there some much stuff still there swept and vacuumed and leveled off the head floor area.
I have 6 liters on Hempel epoxy under coat that Ill use on the cabin sides and also in the foward cabin after we have finished the cabin sides

Today I fitted a light into the engine bay of the magnum. Doubles as a cockpit and stern underwater light.

Select to expand quoteandy59 said..
Pulled all the lining off the Ceiling and the cabin sides.


Still a bit more sanding to be done ![]() I love sanding above my head
I love sanding above my head
Hi Andy hows the sanding going any progress photos? Im interested.
Thanks for that tip on the ceramic jig saw blades they worked really well ![]()

It does not show in this photo but Ive reduced the ply spaced down to 8 mm . Tomorrow Ill trace a mark around the inner pot lights when fitted in there spacer and once thats done Ill use a small router to reduce the thickness out side the inner port light so the same as the 8 mm ply stringers so the cedar can lay flat and butt up to the port light edges.
If the weather is reasonable should be able to sand and under coat the out side of the cabins Its a "off white" Hemple under coat and primer for epoxy

so should get some idea of color on the cabin sides. I will also remove the cabin roof grab rails and do some thing with them either make new ones Id say as they getting a little thin
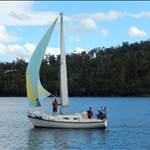
I may do some thing like on the walker below for grab rails

Thanks for asking Hg. Last weekend was a write off due to family birthdays and commitments and I can't get to my boat this this weekend due to the GC 600 motor race
On a brighter note received my paint from Adelaide the only downside is the freight costs as much as the paint. Hoping to paint next week if I can sneak out work

[B
)]![]()
Well Down here we finally put some primer under coat on the boat. The epoxy primer is a off white so after seeing it on the boat Im happy with my choice of light cream and Cream on deck. So I guess the deck and top side going to be patchy for a while .

Select to expand quoteandy59 said..
Thanks for asking Hg. Last weekend was a write off due to family birthdays and commitments and I can't get to my boat this this weekend due to the GC 600 motor race
On a brighter note received my paint from Adelaide the only downside is the freight costs as much as the paint. Hoping to paint next week if I can sneak out work
[B
)]![]()
Hi Andy
Im looking forward to this as I may still attack my cabin roof after the sides are done
I removed 2 badly worn cutlass bearings from my boats stern tube today. Got them out without swearing. One was bronze the other was a phenolic resin, both had rubber inserts

Select to expand quoteJolene said..
I removed 2 badly worn cutlass bearings from my boats stern tube today. Got them out without swearing. One was bronze the other was a phenolic resin, both had rubber inserts
I think you got your moneys worth out of those bad boys Jolene I guess its was a beer and 5 minutes to remove and replace both ![]() I hope you did not swear
I hope you did not swear![]()
Sadly, I feel I never got any moneys worth out of it HG02, but I felt like I had a win removing them. I must say I admire your energy when It comes to your boat fix-er-up-er, as allot of the time I reckon I would be better of financially & mentally handing my boat to the bees and starting again. Keep up your good work.
Select to expand quoteJolene said..
Sadly, I feel I never got any moneys worth out of it HG02, but I felt like I had a win removing them. I must say I admire your energy when It comes to your boat fix-er-up-er, as allot of the time I reckon I would be better of financially & mentally handing my boat to the bees and starting again. Keep up your good work.
Well Jolene you have done some good work on that boat of yours . Some times you think what have I done to it in the last few months it appears like you cant see anything you have done. I some times go back to a photo or two from when I bought her that then gives me hope.
A wise old man(Cisco) once said on here to me B.O.A.T. bring on another thousand He was right. But I love the journey Ive chosen for this boat .
and its been a nice learning experience in its self. Some times I do some things and then alter it or remove it completely. I'm just a Robert and the spider story.
But to me me boat was basically designed for a weekend warrior so he or she could be back in after the weekend for work.
Im just trying to make a nice long term retirement boat that looks appearling and has some comfort and is compact in the same breath. And I like her old lines.
The worst is having to wait for some thing it may be dry, or a part or before you can continue , so I end up with multiple projects half done, quarter done ,and three quarters done and even with these you end up finding a small diversion while doing it.
Sort of one thing leads to another and you can finish the first till you have completed the secondary . The first task might have been a few hours work but the other one you find along the way is a bit longer and stops me completing the first. ( the ramblings of early mornings sorry) The port lights have been a long process and have held up other things I should be doing .But I hope in the end she will look nice and have a few extra comforts with out loosing her old charm.
and saleability. Im going for a sail on another Walker soon so this will open my eyes as well.![]() Lifes a journey enjoy it and cherish every moment you breath
Lifes a journey enjoy it and cherish every moment you breath
Ive taken a couple of days off this week as well as Monday see if I can get some work done on the boat.
I went to work and cut the outer rings Ive still take a little more off after the cabin sides are painted but there close using a thin cut off wheel on a 5 inch grinder I removed the tabs as well and after Ive reduced the out rings enough they will be welded back on


Below I plastered some light cream above the port light rings just to see what it would look like

I gave the port light cut out a little tweek some time I look at them and think there not in line but every time I place a straight egde on them there OK Ill string line they tonight just to make sure when I can get a hand to do it
I also picked up some paint Cream brought it back to the boat and didnt like the color so went back and tried light cream Im still not over the moon
Both colors below light cream far right cream center. To me the cream was to much and the light cream still not real happy

light cream far right just over the primer which is not sanded yet
Below cream and light cream the light cream when its in the photo appears to me near the original color


If it was my boat I would paint the side of the cabin a lighter beige and have it purposely contrasting with the gelcoat.
Hi HG
Are these seaworthygoods.com/store.html any good to stop the water pooling in the portlight recess when it rains
Regards Don
Select to expand quoteDonk107 said..
Hi HG
Are these seaworthygoods.com/store.html any good to stop the water pooling in the portlight recess when it rains
Regards Don
I was goingf to look around for those Donk South Ace gave me the link the other day to another company but they were not long enough
I bought these port lights off ebay for $350 a pair to me that was reasonable value and worht the effert to make them workable as there stainless steel it worth while to me any way


The port light I would have liked would have been well over three times the price and that I could not afford as there is so much more I would like to do to this boat
Tomorrow I will router the port light spacers down on there out side so the highest part will be for mounting the inner port lights

So the ply you can see out side the stainless port light frames will be routed down so my cedar can be rested against the spacer ply. If I can make really good butt ends bringing my cedar up to the edge of the ply spacers I would worry about a trim ring thats what Ill aim for when putting on the cedar

Donk I think the only covers that would fit are the rectangle ones the rest are to short Thanks for the link Ill do some more searching for a while yet thanks mate![]()
I went down to her, said helllo, cranked her donk and ran it until it fully warmed through.
Opened the fwd hatch to get some fresh air through her and then transferred the furling line from the Port side to the Stbd side so the arm on the furler does no longer get in the road of the anchoring operation.
Not big time but a bit of loving on the yacht.