From left to right is:
- the little black box is the NKE autopilot controller.
- Above that is the NKE and NMEA network wiring.
- The next box with the clear lid is the 240V circuit breakers and general purpose AC outlet.
- The next light grey box is the 40A battery charger.
- In front of the fused box in the first picture, but just out of view, are all your battery and overall system isloation switches.
[URL=  .html]
Directly below the AC charger is the engine battery which you can just see. The 4 x 100A house batteries are all forrard of this in the engine compartment, they sit just in front of the engine under the base of the stairs, really neat and very accessible. I'll try and get a photo of the engine bay today.
So today was all on the dock commissioning and testing the various systems.
Tomorrow will be the setting up and commissioning of the Adrena Offhsore software, then we'll squeeze in a sail to test the autopilot interface to the Waypoints generated in Adrena. Wish me luck!
Select to expand quoteShaggybaxter said..

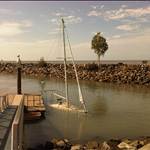
Today... I saw my boat for the first time, I finally made it to Combrit. Threw the bags in the hotel and went for a walk along the harbour to se if I could get a sneak peek at Fusion (it is 3pm on Sunday here), and success! Initially I was shocked, she's bigger than I remembered, but is has been a year and photos don't really give you a sense of perspective. Grinning from ear to ear at the mo, can't wait for tomorrow!
Merci!
Very excited for you Shaggy.... Woohoo!!!
.html] 
Removed the old cutlass bearing I drove to Luxford Marine . I met Mark hes a nice bloke .
Picked up a replacement. Ill need to replace the prop shaft its worn so reassembly wont happen this weekend but Ill epoxy the cutlass bearing into position. Was hoping to use the Vesconite but the standard size was bush 1.250 where as I needed 1 3/8" O.D.


![]()
Select to expand quoteHG02 said..
Removed the old cutlass bearing I drove to Luxford Marine . I met Mark hes a nice bloke .
Picked up a replacement. Ill need to replace the prop shaft its worn so reassembly wont happen this weekend but Ill epoxy the cutlass bearing into position. Was hoping to use the Vesconite but the standard size was bush 1.250 where as I needed 1 3/8" O.D.
![]()
Is it worth waiting for the shaft to align the bearing before you epoxy the bearing in place.?
My boat has a P bracket supporting the end of the shaft and the alignment of the P bracket was not concentric with the shaft, leading to uneven wear on the bearings. On my last slipping, I machined the new bearing down so that it was a loose fit in the P bracket and epoxied it in place to correct the alignment.
basically my bushing hole is a slip fit the epoxy is only there to retain the bearing Libran This is a Walker extreme tolerances ![]()
I would get the shaft first. Bearing may have to be machined to get the correct clearance.
Select to expand quoteRamona said..
I would get the shaft first. Bearing may have to be machined to get the correct clearance.
The bearing is a push fit no need for machining the epoxy just secures the bush in its location there will be no distortion once the bush is in position.
This is an easy replacement compared to some of the mining bushes Ive had to replace.
The old coupling it a concern for alignment as the prop shaft end of the coupling is useless as a guide to alignment. I think Ill have to make a boss and a plate to temp fit on the prop shaft to assist in lining up the engine gearbox to the prop shaft for alignment so I can use feeler gauges and a dial indicator.
The prop shaft end of the old coupling and its boss are a simple cross much like a universal joint on a tail shaft of a car
The cross uses neaprean caps and the flexible elements between the boss and the aluminum flanges. There on the boat don't have them here

the rubber end slide onto the cross and are secured in the aluminum coupling housing the prop shaft end is not a good thing to use for accurate alignment

Thats not rust its copper coat on the coupling and dry lube on the crosses

this photo below is the prop shaft end

The prop shaft is well worn around the cutlass runs
Its not a long shaft
I removed the cutlass bearing using a threaded rod from Bunnings a couple of washers and a some pipe.
Once it broke away from the epoxy it came out reasonable easy


I meant correct clearance to the shaft. Manufacture should have the correct clearance for a wet fit. You do not want it too tight.
Select to expand quoteRamona said..
I meant correct clearance to the shaft. Manufacture should have the correct clearance for a wet fit. You do not want it too tight.
This bush was 1 inch I.D. and as it was a slip fit sliding with your fingers no distortion .
I cleaned out the bore of the housing and it slides in and out with out any force.
So I mixed up some boat cote E glue and slide the bush into the housing with my fingers


Jabberwock had her prop done in prop speed and I watched the process ,and gave me prop to be done to the local ship wright
when it suits him

.html] Today our final job was to understand how to dial in the hydraulic ram on the keel. Over time as the oil viscosity changes, you have to ensure the hydraulic oil regulator, or really it is probably more apt to call it a hydraulic oil brake, is set to ensure it is allowing the right amount of pressure is being provided to lift/drop the keel. You only need to check this once a year, but I wanted to get the hang of it while I had the guys around me.
Someone also asked me earlier on if there was a manual override in case the electronics fail, and I didn't know. The answer is yes there is, you can both manually lift and lower the keel with a manual lever, a bit like a manual bilge pump. In the attached pic, you can see the manual lever to the right of the pump/regulator assembly. There are two small valves, one for up and one for down, where you flick a steel clip over to detent them in and engaging the manual lever.
Mind you , I wouldn't want to do it for sport, the keel is 1600kgs, with 1300kgs in the bottom half, so it takes a good 12mins of pumping manually to move the keel from down to up.

Hi Seabreezers,
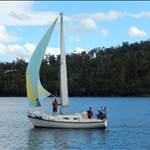
I thought I'd post a link to our last test sail today before the boat got pulled apart for the trip back home.
This is my first attempt at a you tube video, I apologise for the quality!
We found our sweet spot for planing is at 14knots TWS. You can be pretty much anywhere from 110 to 150. At the start of the video you can see the wake separation from the back of the hull, but by the time I got to check the display we'd just dropped off the plane. Damn!
Thought it may be of interest!
Select to expand quotesamsturdy said..
That is so good Shags. Well done mate. Envious.
I don't think your wife would like to plane at 14 knots Sam sturdy . ![]() I'm happy to cruise at 6 plus and enjoy the journey
I'm happy to cruise at 6 plus and enjoy the journey
You must be super stoked Shagoid ! The new toy looks real nice !
Hey HG , you are doing a great Job there , when you retire do you want to start work again on my boat ? ![]()
![]()
Select to expand quoteSandS said..
You must be super stoked Shagoid ! The new toy looks real nice !
Hey HG , you are doing a great Job there , when you retire do you want to start work again on my boat ? ![]()
![]()
How much an hour Sands ![]() plus beers you can drink and watch
plus beers you can drink and watch
I scraped and clean more of the bilge and epoxied a round fiberglass plate over the old engine sea cock internally so I can cut a hole slightly larger .
Ill epoxy a 1 inch true design hull through in place next weekend and prime and paint out more of the bilge.. The fiber glass plate will be permanent and will add more hull thickness for more support.
I trial fitted my old prop shaft using the area that had never been used and every thing OK

I did notice the bottom of the cutlass bearing housing has some pitting Ill put some epoxy on and and smooth it down
next weekend


Select to expand quoteHG02 said..samsturdy said..
That is so good Shags. Well done mate. Envious.
I don't think your wife would like to plane at 14 knots Sam sturdy . ![]() I'm happy to cruise at 6 plus and enjoy the journey
I'm happy to cruise at 6 plus and enjoy the journey
I think you're absolutely right HG. Iv'e got no idea what it's like to plane on a sail boat, but it must be awesome.
However, as you say HG, can't let the Missus do anything awesome.
Jeez you go away for a few days and everything happens. HG I dream bout having a sparkling clean bilge like yours. Shaggy Fusion is awesome, I just love it; and Guitz coming along nicely.

Nothing major but has made an enormous difference to the boat.
Painted the timber work inside the head & put up a few hooks & transformed it into a wet locker. Can now hang-up the wet weather gear & it should dry overnight.
P.s NASA marine are putting out some great new quality products I recommend them fully and poastage to Australia is usually covered within 7 days.


I knew it some drama! It's not showing no where near my fridge discharge and no where near my solar charge.....must be a negitive bypassing the buzz bar somewhere! Hmmmmmm scratch head have a beer!